Feb 15, 2015: Case Studies – Heat Doesn’t Rise It is a commonly held misconception that heat rises. In fact heat travels equally well in all directions. While it’s true that hot air and hot water will rise due to convection currents, this is only one of the ways that heat moves. The truth is that heat moves in three main ways; conduction, convection and radiation and, particularly with conduction and radiation, heat will travel just as easily downwards as upwards or sideways.
So why the science lesson? Over the last week or so I’ve been involved in consulting to a couple of clients who have problems (or potential problems) with heat going downwards. These are common issues in houses so I thought it worth sharing some information about them.
Case 1: The Unventilated Black-tile Roof
 The north wall of a house in the Southern Highlands of NSW. Note the black tile roof with no eave overhang and no ventilation. One of my regular readers has recently bought a house near the Greeny Flat in the Southern Highlands of NSW. Although this has been a very cool summer, she is finding it hard to keep the building cool on hot days. She has tried doing what I recommend for the Greeny Flat, which is to close all the windows and blinds during the day and open everything up at night, but it isn’t working for her. She thought it was because there was too much sun coming in through the north and west facing windows so she asked me to come and have a look and make some recommendations on how best to shade these windows.
While this is generally a cool climate by Australian standards, it can get pretty hot in the summer time. There is an unfortunate tendency these days to build houses like this one with brick-veneer walls, dark tile roofs and no eave overhang. In my opinion this should be illegal in Australia. Thermally massive materials are only helpful to the energy performance of a building if they are placed inside the thermal boundary (the insulation and air-sealing layer). Brick veneer puts the thermal mass on the wrong side of the insulation. So does a tile roof. These will not help to keep the building warm in winter and will only serve to keep the place hot well into the night in summer. So when I arrived at this house the first thing I noticed was the black color of the tiles and the lack of any eave overhang on the hipped roof. I don’t know why anyone would build a house with no eaves but I suppose it’s a combination of a current trend and a cheaper way of building. Nevertheless, eaves do several important things: they help to keep rain off the walls, windows, and doors; they help to shade the walls, windows and doors in the summer; and, particularly in a house like this one that has a hipped roof, they provide a way ventilate the attic. With other roof forms like gable roofs it is possible to ventilate the attic by providing louvre vents in the gable end walls. But with hipped roofs there are no gable end walls and the only places you can put ventilation are in the eave overhangs or directly through the roof (using something like a Whirlybird). This house has neither of these.
After hearing what her problems are and having a look around the house, I climbed up into the attic to have a look. It was a cool and overcast day outside but the attic was probably 50degC. As I suspected, there was very little ventilation in the attic, just a few cracks around the edge of the roof. So, in spite of the fact that there was a reflective foil sarking installed directly under the roof tiles, there was a great deal of heat radiating down from the black roof tiles above and accumulating in the attic space. On a really hot day I would not be surprised if that attic got up to 70degC or hotter.
As I also suspected, there was only a thin layer of insulation batts on the ceiling (probably about R1.5) and not very well installed. This means that the heat from the attic can readily radiate DOWN into the house below (hence the science lesson above). So, in effect, her entire ceiling becomes a radiator during the day and well into the night (due to the tendency for massive materials like tile to hold heat). This is why it wasn’t working for her to close the house up during the day. That technique only works if the ceiling is well insulated, the attic well ventilated, and the walls and windows well shaded. Her’s aren’t.
My first recommendation to her was to get quotes for a) installing some sort of ventilation through the roof (either the Whirlybird type of some sort solar powered fan) and b) to add another, thicker layer of insulation to her ceiling (at least R2.0 over the top and laid in the opposite direction to the batts that are already there).
I also suggested that, as a temporary measure she attach some shade cloth to the gutters on the north and west sides of the house and angle it out away from the building to some tent pegs in the lawn. This will serve to shade the north and west facing walls, windows and doors which will further help to reduce the heat gain to the interior during hot days. This is cheap and easy to do and, if it works well, we can look at ways of doing the same job in a more permanent way such as awnings, porches or trellises.
 ‘Draftstoppa” ceiling fan cap One further recommendation was that she look at installing something like the ‘Draftstoppa’ pictured onto the bathroom exhaust fans that currently vent directly into her attic. In a poorly ventilated attic like hers this can create serious condensation problems in the attic in winter time. For this reason, ideally, all bathroom and kitchen exhaust fans should be vented directly to the outdoors and NOT into attics or under houses. The Draftstoppa doesn’t correct that problem but adding ventilation to the attic will help to alleviate it. What the Draftstoppa’s will do is to help prevent cold air from the attic dropping down into the house in the winter time. And the extra insulation that she adds for summer cooling will also help to keep the warm air in the house where it belongs in winter.
Case 2: The Steel Framed Floor
 Mittagong granny flat with walls and roof of steel-clad foam-core SIPS panels. Note the steel framed, off-the-ground floor structure. Another project that I’ve been helping with lately is a little granny flat that a friend of mine is building in the back yard of his Mittagong home. The owner is on a very tight budget and doesn’t have a lot of building experience so he has chosen to use a SIPS panel building system which promises to be quick and easy to erect while still providing exemplary thermal performance. Right now, as you can see from the photo above, it looks a bit like he’s building a big esky because the windows and doors will mostly be cut out of the panels after the roof is on. I’ll be very interested to see what it looks like when it’s all finished. Meanwhile he’s finding it relatively simple to cut and fit the panels into place.
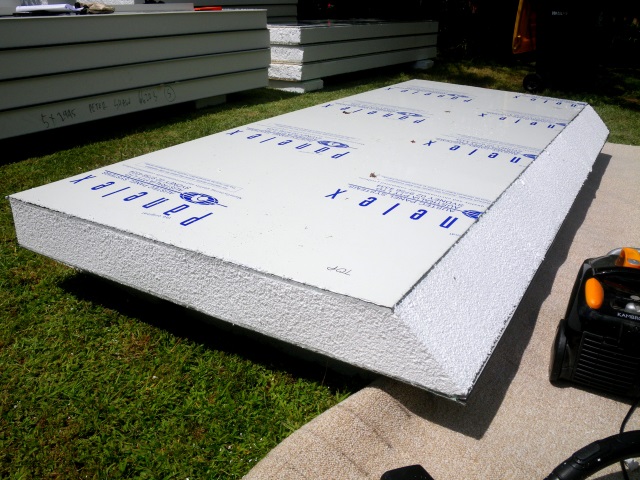 These 200mm-thick steel-clad SIPS panels make up the granny flat’s walls and roof. As you can see from the photo above, there is a LOT of foam in those walls and the roof will be at least as thick. He also will be using double-glazed windows. So five sides of his simple six-sided structure will be very well insulated. The tricky part for him is going to be the steel-framed floor.
As discussed above, heat can travel by radiation and conduction equally well in all directions and steel is a VERY good conductor of heat. So it’s going to be very interesting to see if we can come up with a system that effectively reduces the amount of heat loss through his floor in the winter time. It will also need to be relatively inexpensive, easy to install, and durable. I’m glad he took my advice to raise the floor far enough off the ground to make it fairly easy to move around under the house because all the work of insulating the floor is going to have to be done from underneath. If anyone has any brilliant ideas for how to easily, durably and effectively insulate this floor please let me know.
The other problem with this type of construction is that it doesn’t incorporate any sort of thermal mass inside the thermal boundary of the building. This means that he’s going to have trouble maintaining a relatively constant temperature unless we can figure out a way to store heat inside the house. One possibility that I’ve been exploring for some time now is the use of Phase Change Materials for heat storage. More on that soon.
|
We will not share your information with anyone else and you can unsubscribe at any time.
Recent Newsletters
-
Apr 6, 2024: Open for Sustainable House Day
-
Apr 1, 2022: These floods are no joke
-
Mar 4, 2022: Disasters of Our Own Design
-
Nov 12, 2021: Free Zoom Screening of ‘Now’ Movie on Sunday
-
Nov 5, 2021: The Times They Are A-Changing
-
Oct 14, 2021: Sustainable House Day is Back… virtually
-
Sep 24, 2021: Two Years In the Cottage
-
Jun 25, 2021: Cheap and Simple EV
-
May 14, 2021: 3D Printed Earth Home
-
Feb 26, 2021: Doing Something About It
-
Feb 12, 2021: Barangarooted
-
Jan 29, 2021: Our House on the ABC
-
Jan 8, 2021: Electric Vehicle Madness
-
Dec 12, 2020: Water Works and Solar Cars
-
Nov 13, 2020: Arts Trail Open House
-
Oct 2, 2020: Another Year of Living Positively
-
Sept 18, 2020: Virtual Sustainable House Day on Sunday
-
Sept 11, 2020: Back in Mittagong
-
Aug 28, 2020: One More Week in Port Macquarie
-
August 21, 2020: Progress Report
-
August 14, 2020: This week’s progress report
-
August 7, 2020: Port Project Photos
-
July 17, 2020: Port Macquarie Project Progress
-
June 26, 2020: All Electric Workhorses.
-
June 19, 2020: Port Macquarie Project
-
June 5, 2020: Mount Gibraltar Stone Stairway
-
May 22, 2020: Morrison Wants To Give $11M To A Coal Baron
-
April 22, 2020: Happy Earth Day
-
Mar 13, 2020: Coronavirus makes me feel lucky
-
Feb 20, 2020: Kitchen finished
-
Jan 31, 2020: How To Build a Fire-proof House
-
Jan 24, 2020: Back To Work
-
Jan 3, 2020: Childhood Beach Devastated By Fire
-
Nov 22, 2019: Energy Positive Success
-
Nov 1, 2019: Art Studio Trail This Weekend
-
Oct 18, 2019: Solar Monitoring and Upcoming Events
-
Oct 11, 2019: Queen St Renovations
-
Sept 28, 2019: Greta vs Growth
-
Sept 6, 2019: Sustainable House Day 2019 next weekend.
-
Aug 30, 2019: Solar Installed
-
Aug 23rd, 2019: Solar System Ordered and Other Notable Stuff
-
Aug 16, 2019: Two Projects Finished and Sustainable House Day Coming Up.
-
July 12, 2019: The Beauty of Bamboo
-
July 5, 2019: Back To Russell Island
-
June 28, 2019: Kitchen Upgrade
-
June 21, 2019: What’s Your 2040?
-
May 24, 2019: Public Meeting in Bowral on Friday 31st of May
-
April 26, 2019: Reader Feedback on Granny Flat Economics
-
April 12, 2019: The Economics of Granny Flats
-
Feb 20, 2019: Russell Island Home Tour
-
Feb 8, 2019: Russell Island Nearly Finished
-
Jan 25, 2019: Progress and Other Good Stuff
-
Jan 18, 2019: New Leaf and Progress Photos
-
Jan 4, 2019: Doors and Architraves
-
Dec 28, 2018: Russell Island house progress.
-
Dec 12, 2018: Back on Russell Island
-
Nov 16, 2018: Greeny Flat For Rent
-
Nov 9, 2018: A Tale of Two Houses
-
Oct 2018: Is The Housing Market Starting to See the Light?
-
Sept 16, 2018: Greeny Flat Testimonial.
-
Sept 7, 2018: Lighter Roofs and Cheaper PHEVs
-
August 31, 2018: Windows and Cladding
-
August 17, 2018: Adamant About Eaves
-
August 3rd, 2018: Raising the Roof
-
July 27, 2018: Progress Photos
-
July 13, 2018: Project Progress
-
July 7, 2018: Affordable Housing Project in QLD
-
May 11, 2018: DIY Retrofit Double-Glazing
-
May 4th, 2018: Greeny Flat Available to Rent – Jun/Jul/Aug
-
April 20, 2018: Why you MUST monitor your solar system.
-
April 6, 2018: 4th Earth Day Party – April 22
-
March 30, 2018: It’s a Great Time For Solar
-
March 23, 2018: Beware of Tradies In Your Attic
-
March 16, 2018: More Sustainable Subdivisions
-
March 2, 2018: More Solar For Landlords and Renters
-
Feb 23, 2018: The Reroofing Begins
-
Feb 16, 2018: Record Year for Rooftop Solar
-
Feb 9, 2018: Cooking With Compost
-
Feb 2, 2018: Waste-to-Energy Systems
-
Jan 16, 2018: Should I Replace My Tile Roof
-
Dec 12, 2018: More About Keeping Cool
-
Jan 5, 2018: Keeping Your Cool
-
Dec 29, 2017: Happy New Year
-
Dec 22, 2017: Upside-down Season
-
Dec 8, 2017: Bitcoin Climate Disruption
-
Dec 1, 2017: The Coming Disruption
-
Nov 24, 2017: Suncrowd Review – 0 Stars
-
Nov 17, 2017: Tesla Tiny House Here Next Week
-
Nov 2, 2017: Montana Off-grid Eco Tiny House
-
Oct 27, 2017: Glorious Rain and Good Results
-
Oct 20, 2017: Cattle… Good or Bad?
-
Oct 13, 2017: The Snow Shows Where the Heat Goes
-
Sept 6, 2017: Tesla Tiny House coming to Bowral
-
Sept 29, 2017: Home Solar and Double-dipping on Carbon Emissions
-
Sept 22, 2017: Time to Load Up On Solar
-
Sept 15, 2017: Sustainable House Day This Sunday.
-
Sept 8, 2017: Project Progress, Yellowstone, Etc
-
August 31, 2017: Day Tripping in Montana
-
August 25, 2016: Electric Vehicle Update
-
August 18, 2017: State of The States
-
August 11, 2017: Cool Stuff
-
August 4, 2017: Going to Montana
-
July 28, 2017: Episode 13 – West Side Shade Awning and Deck
-
July 21, 2017: Now That’s True Sustainability!
-
July 14, 2017: How To Choose The Best Electricity Retailer
-
July 7, 2017: A Year of PHEVing It.
-
June 30, 2017: Case Study – Holiday House Energy Upgrade
-
June 23, 2017: In The News This Week
-
June 16, 2017: Grow Your Bricks and Monitor Your Energy
-
June 9, 2016: A New Ethical Energy Retailer
-
June 2, 2017: Dark Days and Bright Spots
-
May 19, 2017: Things That Caught My Eye
-
May 12, 2017: The Sublime and the Ridiculous
-
May 4, 2017: Episode 12 – Replacing the Sewer Lines
-
April 28, 2017: Doing the Dirty Work
-
April 21, 2017: Ban the Bag
-
April 14, 2017: One Down, One Billion to Go.
-
April 7, 2017: 3RD EARTH DAY PARTY – April 22
-
March 30, 2017: Electric Shocks
-
March 17, 2017: Big Changes Coming
-
March3, 2017: Massive Erections
-
Feb 24, 2017: PHEV Love
-
Feb 2, 2017: Every Home Needs This!
-
Feb 3, 2017: Episode 11 – How To Make a Solar Air Heating Wall
-
Jan 20, 2017: Episode 10 – Why Build a Solar Air Heating Wall?
-
Jan 13, 2017: Agents of Change and a New Local Brew
-
Jan 6, 2017: Starfish and the Cost of Australia’s Poor Quality Houses
-
Dec 23, 2016: Episode 9 – What’s a Trombe Wall?
-
Dec 16, 2016: Episode 8 – Retrofitting Passive Solar
-
Dec 11, 2016: Episode 7 – New Windows in Old Walls
-
Nov 25, 2016: Repower Excitement and Episode 6
-
Nov 18, 2016: Community Renewable Energy Investment Opportunity
-
Nov 4, 2016: Window Replacement and Tesla’s New Battery
-
Oct 28, 2016: Suncrowd! What a Buzz!
-
Oct 20, 2016: Episode 4 and Catchpower Answers
-
Oct 14, 2016: Episode 3 – Borers, Rot and Underfloor Ventilation
-
Oct 7, 2016: Episode 2 and SunCrowd Invitation
-
Sept 30, 2016: Home Energy Retrofit Video 1
-
Sept 23, 2016: Catch Power – So What’s The Catch?
-
Sept 16, 2016: What To Do at the End of the 60c Feed-in Tariff
-
Sept 9, 2016: Happy Sustainable House Day!
-
Sept 2, 2016: The Beginning of the End of Solar Subsidies in NSW
-
August 25th, 2016: Lessons from an Infrared Camera
-
Aug 19, 2016: Open Source Tiny Homes
-
August 12, 2016: Sustainable House Day 2016
-
Aug 4, 2016: Solar Bulk-buy with SunCrowd
-
July 29, 2016: ‘Free’ Power with Repower
-
July 21, 2016: Fibro Cottage Energy Retrofit
-
July 15, 2016: Science With a Conscience
-
July 8, 2016: Election Day – Droning On
-
June 25, 2016: ‘Renewable Electricity’ is NOT ‘Renewable Energy’
-
June 19, 2016: The Power of TV and The Rise of The Machines
-
June 12, 2016: Magnetite, Drones and Climate Action
-
June 4, 2016: Stools to Fuels
-
May 29th, 2016: The Future of Energy?
-
May 21, 2016: Concrete Alternatives and PCM’s
-
May 15, 2016: First the Good News
-
May 8, 2016: Underslab Insulation
-
May 1, 2016: Counting Comfort and Costs
-
April 24, 2016: Celebrating Two Years of Energy Positive Living
-
April 17, 2016: Gimme Three Reasons
-
Apr 10, 2016: Second Earth Day Party, 4-7pm April 22nd.
-
April 3, 2016: Home Battery Updates
-
Mar 26, 2016: An Electric Transportation Revolution
-
Mar 18, 2016: Mould and Other Fun Stuff
-
Mar 12, 2016: Reader Feedback and Lithium Issues
-
Mar 6, 2016: Beware of ‘Standard Practices’
-
Feb 28, 2016: Fossil Fools
-
Feb 20, 2016: Grow, Cook, Eat – Offgrid Power – and Welsh Cars
-
Feb 14th, 2016: Gotta Love These Little Houses
-
Feb 7, 2016: Renewable Energy Prepares For Take Off
-
Jan 24, 2016: PHEV Goes Bush
-
Jan 17, 2016: 1.5L/100km
-
Jan 10, 2016: How To Reduce Our Carbon Footprint
-
Jan 3, 2016: PHEV Goes Camping
-
Dec 27, 2015: Electric Driving Less Than Half The Cost of Petrol
-
Dec 20, 2015: Our First Week With an Electric Vehicle
-
Dec 13, 2015: Putting My Money Where My Mouth Is.
-
Dec 13, 2015: Paris Talks Waffle?
-
Nov 29, 2015: Walking for Climate Action and Driving Electric Vehicles
-
Nov 15, 2015: Battery Storage Options
-
Oct 8, 2015: The Big Disconnect?
-
Nov 11, 2015: 7,377,870,064 Elephants in the Room
-
Oct 25, 2015: Pros and Cons of Granny Flats
-
Oct 16, 2015: Greeny Flat Wins Green Globe Award!
-
Oct 11, 2015: What’s Wrong With This Picture?
-
Sep 27, 2015: Build Tight, Vent Right
-
Sep 20, 2015: Driving Sustainability
-
Sept 12, 2015: Greeny Flat Named 2015 Green Globe Awards Finalist
-
Sept 6, 2015: Sustainable House Day
-
August 27, 2015: Water, Water Everywhere!
-
August 23, 2015: Back in Brazil
-
August 14, 2015: Ranch Life and Sustainable House Day
-
August 7, 2015: Greetings From Montana
-
August 8, 2015: Renewable Choice for Oz Voters
-
July18, 2015: Whoops, I Spoke Too Soon
-
Jul 12, 2015: Nice Weather for Eskimos
-
Jul 5, 2015: Solar Planes, Trains and Automobiles
-
Jun 28, 2015: Greeny Flat Welcomes Sustainable Lifestyle
-
Jun 21, 2015: Happy Winter Solstice!
-
Jun 14, 2015: Test Drive the Greeny Flat
-
Jun 7, 2015: Visit to a Local Food Forest
-
May 31, 2015: Exciting Times!
-
May 24, 2015: The Heat Goes On
-
May 17, 2015: DIY Solar Air Heater Prototype
-
May 10, 2015: K.I.S.S. My House
-
May 3rd, 2015: Tesla Reinvents Electicity
-
Apr 26, 2015: Party Pics and Random Bits.
-
Apr 22, 2015: Experiment Declared Resounding Success!
-
Apr 19, 2015: Greeny Flat’s 1st Earth Day Party this week
-
Apr 12, 2015: Sand Wars, Floating Solar Farms and other Fun Stuff.
-
Apr 5, 2015: Invitation to a Party
-
Apr 4, 2015: UK’s First Carbon Neutral Town
-
Mar 21, 2015: Latest Results and Reader Feedback
-
Mar 16, 2015: Our Double-glazed Windows
-
Mar 8, 2015: Form Follows Function
-
Mar 8, 2015: Reader Feedback
-
Mar 1, 2015: Some Fun Stuff
-
Feb 22, 2015: Proof Positive
-
Feb 15, 2015: Case Studies – Heat Doesn’t Rise
-
Feb 8, 2015: In all sorts of hot water
-
Feb 2, 2015: Rethinking the way we design and build
-
Jan 25, 2015: Latest Results and Electric Vehicles.
-
Jan 20, 2015: The GreenPower plot thickens
-
Jan 18, 2015: Switching to Green Power
-
Jan 11, 2015: Our surface-mounted electrical system
-
Jan 4, 2015: Our Solar Power System
-
Dec 28, 2014: Sandwiches for Cathedrals
-
Dec 24, 2014: December Results
-
Dec 16, 2014: Eco-home Display Village Concept
-
Dec 14, 2014: All New Homes to be Energy Positive by 2016.
-
Dec 7, 2014: $41 Energy Bill for last three months
-
Nov 25, 2014: Think light for a cooler roof
-
Nov 22, 2014: Staying cool in the heat
-
Nov 9, 2014: The benefits of a small home.
-
Oct 26, 2014: Last Sunday the Greeny Flat made 4 TIMES as much energy as it used!
-
Oct 12, 2014: Lessons learned so far
-
Oct 10, 2014: Why an all electric house?
-
Sept 22, 2014: Great Day for Renewable Energy
-
Sept 21, 2014: Greeny Flat Cost Analysis
-
Sept 11, 2014: $10.63 worth of energy in 3 months.
-
August 30, 2014: Greeny Flat open for Sustainable House Day
-
August 22, 2014: Four months and going strong.
-
July 22, 2014: Three month’s results… All Positive!
-
July 4, 2014: Energy Independence Day!
-
June 11, 2014: Cintia’s winter
-
May 27, 2014: Greeny Flat on ABC
-
May 27, 2014: Cool Fridge Wins Energy Star Wars
-
May 23, 2014: Testing the air-tightness
-
May 19, 2014: First month’s results… VERY promising!
-
Apr 22, 2014: Earth Day marks the start of one year of monitoring
-
Mar 24, 2014: start of a big week
-
Mar 7, 2014: BASIX is a JOKE!
-
Mar 6, 2014: starting on the kitchen
-
Mar 1, 2014: Pumps and Solar Hot Water: decisions, Decision, DECISIONS!
-
Feb 24, 2014: Greeny Flat in the news
-
Feb 20, 2014: surface mounted electrical system
-
Feb 19, 2014: end in sight for the construction phase.
|
Would you not be able to put similar insulated panels either on top of our under the floor? Or is that expensive?
There is underfloor foam panels designed to squeeze between joists, but I’m not sure if your structure will fit them.
Hello again Mark and sorry (again) for neglecting to respond more promptly to your comments. Regarding SIPS floor panels: in the states there are options for fabulous SIPS floor panels that you can get as big as 8′ x 24′ (2.4m x 7.2m). Unfortunately I haven’t been able to find anything even close to that here. There is one company I found so far who makes a 1.8m x 3.6m flooring panel with OSB on both sides of the foam. This would be a pretty good option for a suspended floor, you’d just have to place beams at the required intervals to support it. The trouble with this system for a passive solar design is that you lose the thermal mass of the concrete slab so you then have to find a way to either add thermal mass to the interior of the building or use phase change materials (PCMs) for heat storage. One possible answer to this is a company that I’ve only heard about and haven’t investigated yet called ‘Smartslab’. I heard from a friend that this company has started up in our local area and are making a suspended floor system with a steel frame and deck which covered by a thick layer of foam insulation and then a concrete floor is poured on top of that. It sounds like a promising option for suspended floor situations because the foam insulation would be continuous (no thermal breaks as you get when you install the foam panels between floor joists) and the slab gives you thermal mass where you want it (i.e. on the inside of the insulation layer). I will be finding out more about ‘Smartslab’ and reporting on them soon. Cheers, Andy