I’ve been saying it for years and it’s nice to see that the message seems to be getting through. This week I received the the following email from one Newsletter readers…
Hi Andy, I decided to replace the roof on the house I live some 7 years ago. It’s situated in the Macedon Ranges area of Victoria, which is best described as sub-alpine, and as is commonplace in Australia, also gets some ferociously hot weather come summertime. Daytime temperatures inside the old brick veneer house would get up to 30 deg, and down to 6 on frosty mornings. This was mostly due to the appalling spec house design and build, inadequate or absent insulation, old single-glazing and draughts, coupled with poor heating systems. Occupants must have just wrapped up in winter and drunk many cold beverages in summer. Pretty typical nationwide really.
The original roofing was Wunderlich terracotta tiles, and then, after a tree fell on the roof they were completely replaced (presumaby on insurance) with Monier concrete tiles. By the time I got there about 30 years later there were old thin yellow batts covered in dust and leaf litter, small branches and detritus from the tree fall, and the old tiles were well past their limited prime. No longer sealed by glaze they let in moisture and the house was damp in winter. In summer the roof space temperature was close to 65. The batts would have only been R2 at their best, and this area demands at least R3.5. Bushfire is also a consideration here, and I wondered about all the leaf litter accumulating at the roof edges. Although expensive it was time to replace the lot.
I chose to reroof with Colorbond in Paperbark (much lighter shade than the brown tiles) and put down foil faced roof blanket over the new top-hat battens. I installed R3.5 earthwool bulk insulation- after getting some poor buggers to clean out the roof space of all the accumulated crud and the dusty,thin insulation. To finish I installed a clear whirlybird vent so I could see what was going on in the roofspace if I ever got up there, because the sheets and blanket exclude nearly all daylight, and because various ventilation fans simply vented into the roofspace only. I wanted it to be dry and lose heat in summer. Having read your highly informative article on FLIR photos of house structures, I would be interested to know what heat gets lost in winter through that vent.
The difference is startling, especially inside the roofspace. The house interior can drop to 8 if unoccupied and unheated, and it still can climb to 28 in heatwave conditions, but it is drier, and easier and cheaper to heat. I don’t have any airconditioning, and I think careful management of gardens and shade onto windows would be sufficient to let ventilation take care of hot weather. There is much still to be done, but the reroofing, which probably came to about $20,000, was a vast improvement, not least of all in looks. Much of the housing stock in this country is dreadfully inconsistent with the climate, and I reckon that can be put down to simple greed on the part of developers trying to get sales with appealing features rather than good design. Right now, and I cannot believe this is happening still, swathes of suburbia are covered in slate grey tiled roofs. Crazy.
Lucinda.
A sea of dark tile roofs is a common sight in Australian subdivisions. (Source: The Fifth Estate)
Thanks Lucinda, I couldn’t have said it better myself. You’re right that the poor-performing house you describe in the first paragraph is absolutely typical here in Australia. I’m happy that you chose to re-roof using light-coloured steel with anit-con blanket and good ceiling insulation. Venting the roof space is also essential in my opinion.
Not only does it remove excess heat and keep the house cooler in summer, it also removes excess humidity and keeps the house drier in winter. Winter is when condensation is more likely and can lead to moisture and mould problems, especially in poorly-vented attics. So yes, you might lose a bit of heat through the vent but it’s more important to get rid of any excess moisture, especially if you have bathroom or kitchen fans vented into the attic instead of to the outdoors as they should be.
In my opinion, you need good roof-space ventilation PLUS good insulation and air-sealing at ceiling level to keep the heat inside you house in winter (and outside in summer).
Mitsubishi Drops Price of Outlander PHEV.
Regular readers will know how much we love our Plug-in Hybrid Outlander. We’ve had ours for nearly two years now and it’s proven perfect for us. We’ve used it to haul building materials and tow trailers. We’ve taken it on long trips, camped in the back and, most importantly, used a lot of our excess solar power to charge it for most of our local driving. Lately it’s been absolutely perfect for our time on Russell Island. In fact we haven’t put any petrol in it for the entire three months we’ve been here.
Our Plug-in Hybrid Electric Vehicle loaded up and ready for adventure.
It’s such a wonderful vehicle I’m constantly surprised that Mitsubishi doesn’t make more of an effort to advertise or sell them. So I was surprised and delighted to read in this article from the Sydney Morning Herald, that Mitsubishi has dropped the price of the base model PHEV. It’s still pretty expensive at $46,000 but at least they’re doing something to entice people to buy them.
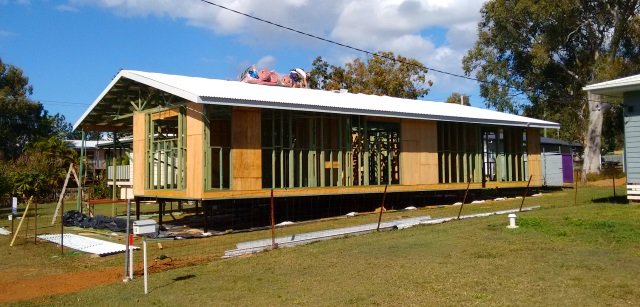
Since our last Newsletter we’ve managed to finish installing the windows, complete the electrical rough-in, and make a pretty good start on the exterior cladding.
Windows in and cladding going on.
We’re using a light (‘Surfmist’) coloured corrugated steel for our exterior walls (as well as the roof) because it reflects the heat better than a dark-colour and because Colorbond steel does not require any painting or maintenance once it is installed.
We only have a couple of weeks left before we have to start thinking about returning home to the Greeny Flat so we’ve decided just to focus on getting the exterior finished for now. We’ll leave the gyprock for the moment and turn our attention to the interior when we return for the next round.
For the last couple of months Cintia and I have been working on an affordable housing project in Queensland. I’ll give an update on that in a minute but before I do I’d like to take a brief side-track and talk about the importance of a good roof overhang.
Is this the epitome of contemporary design? (Image Source: freshome.com)
You see this sort of thing all the time on shows like ‘Grand Designs’ and in glossy magazines promoting the latest trends in style and fashion. It’s usually described as ‘Modern’, ‘Sleek’, ‘Minimalist’ and ‘Stylish’. This is rubbish! What it should be called is ‘Dumb’, ‘Stupid’, ‘Idiotic’, and ‘Moronic’.
From the viewpoint of energy-efficiency, sustainability and durability there are SO many things about this style of home that I could criticise, from the acres of glass and the tons of steel and concrete to the flat roofs and lack of insulation or consideration for climate. But the thing I want to focus on today is the lack of proper eaves (or roof overhangs).
As every bushie knows, if you’re going to be exposed to the elements, you need to have a good hat and boots. In the building arena this translates to a good roof (with adequate slope and overhang) and solid foundations that lift the building up out of any potential moisture problems. It’s just good-old common sense, right?
Protection from the environment plays an important part in the thermal comfort and durability of houses, in both cool and hot climates. A simple method is to extend the roof well over the external walls of the typical house to form an eaves overhang or, if further extended, a verandah.
Incorporating eaves and overhangs provides a number of important benefits, into your structures such as:
shading walls from excessive solar gain
keeping direct sun off the window glazing
allowing windows to be left open for comfort ventilation while still providing shelter from rain and
protecting large areas of walling from rain, keeping wall surfaces relatively dry and free from staining and mould growth.
Unfortunately, the recent trend to reduce the width of traditional eaves and, in some instances to eliminate eaves altogether… deprives the home owner of these benefits and increases running costs of comfort measures, such as air-conditioning.
I couldn’t have said it better myself (although I would add that the correct amount of roof overhang can be calculated to provide solar gain for winter warmth and shading for summer cooling – see our section on Passive Solar Design for more information).
As far as I’m concerned, the correct amount of roof overhang is absolutely essential to good building design. So the next time you see or read something that describes a ‘Modern’ home with a flat roof and no eave overhang as ‘Stylish’ or ‘High Design’ I suggest you do what I do and shout ‘RUBBISH!!!’ at the television or magazine in question.
Project Update
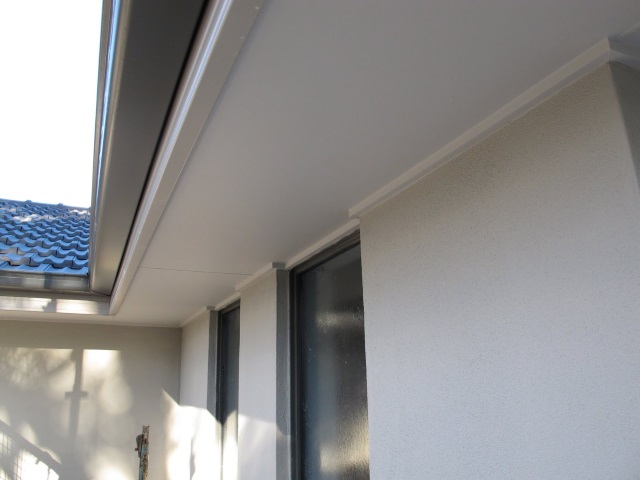
Speaking of roof overhangs, Cintia and I have spent the last few days installing the eave linings on the house we’re building.
Today’s progress photo showing the eave linings and furring strips.
We’ve also been adding furring strips (or spacers) to the exterior walls to provide an air space between the sarking and the cladding. This does two things…
It creates a space between the sarking (the silver fabric wrapped around the exterior walls) and the cladding (which will be corrugated Colorbond). This allows the reflective surface of the sarking to effectively block radiant heat. If the cladding were installed tight to the sarking heat would be conducted directly from the corrugated metal through the sarking and into the walls.
The air space also allows air to move behind the cladding. When the sun hits the corrugated metal and heats the air behind it, the warm air can rise up in the air space, vent out the top, draw cool air in at the bottom and help to keep the walls cool.
If you look closely you can see a strip of insect screen along the bottom of the wall. This will cover the air gap at the bottom of the wall and help stop too many spiders and wasps from taking up residence in our walls.
We’ll wrap the screen around the furring strips so it covers the gap at the bottom.
The part we haven’t done yet is to add vents in the eave linings. Below is a picture of a typical Australian roof with a dark, hipped roof (shaped like a pyramid) and no vents in the eaves.
A typical dark, hipped roof with no eave vents.
This is an INSANE way to build a roof in our hot climate. A dark-coloured roof absorbs way more heat than a light-coloured one and a hipped roof is much harder to ventilate than a gable roof (one shaped like an open book), especially if you don’t install any vents in the eaves or near the ridge.
Ideally you want both eave and ridge vents so that heat in the attic can rise up and out the ridge vent and draw cool air in from the eave vents. In our case we’ll have vents high up in the gable ends of the roof and small, round vents in the eaves like these.
We’ll have vents like these every 1200mm for the length of our eaves.
So, with our light coloured roof which has insulation blanket under it and our well-ventilated eaves and attic, our house will have a much better chance of staying cool in a hot Queensland summer than your typical Australian home.
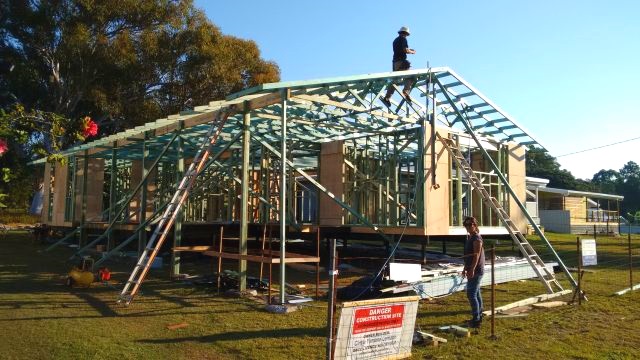
We’ve had a very busy week here in Queensland. Since getting our frames and trusses installed last week we’ve been taking care of a lot of bracing and tie-down details. We’re not in a cyclone zone here but, being on the coast, there’s potential for some pretty high winds which can cause wracking, shear and uplift forces. To combat those, the codes require that we install a lot of protection in the form of bolts, connectors, cyclone ties (to hold the trusses down to the wall frames) and even threaded rods fed all the way down through the wall frames to tie the roof down to the foundations.
Threaded rods being fed down through holes in the wall framing.
It took us most of this week to get all those details finished and they all had to be done before we could put the roof on. We’ve been very lucky with fine weather so it was a big relief to put the roof on today with help from a few local blokes.
Installing the roof which is a light-coloured Colorbond to reflect the Queensland heat.
So now the pressure is off a bit. We still have a lot to do to get the house to lock-up stage but at least we’re partially protected from rain.
As mentioned in our last two Newsletters, Cintia and I are up in Queensland working on an affordable housing project. This week I thought I’d share a few images to show you what we’re aiming for and how far we’ve got.
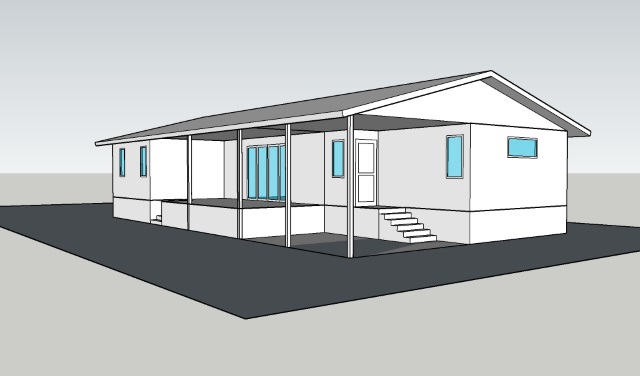
Below is a screenshot of a 3D model which gives an idea of what the house will look like from the street.
3D model as viewed from the street (NE).
It’s a simple house of about 100sqm with 3 bedrooms, 2 bathrooms, a deck and a carport. We aren’t doing anything special to make it energy efficient like we did with the Greeny Flat because the climate up here on Russell Island is so mild all year round. The main consideration in terms of staying comfortable is summer shading and cross ventilation. Whenever it gets warm in summer a beautiful, cooling sea breeze comes in from the east. The following floor plan shows how this house has been designed to allow the breeze to cool all the rooms, even if the bedroom doors are closed.
Floor plan showing how the house is designed to make the most of the summer sea breezes.
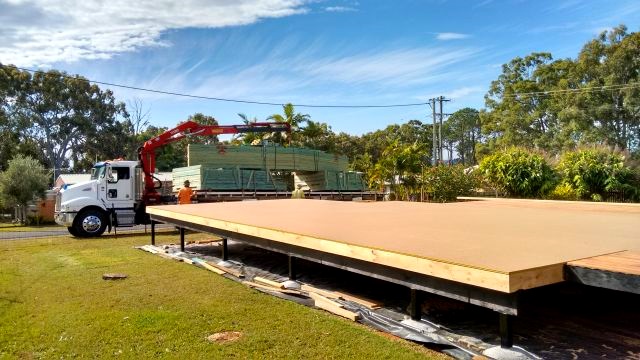
We had a bit of a slow start to the building project but we’re making some good progress now. Our trusses and frames were delivered last Friday.
Getting deliveries across to the island adds an extra layer of cost and complexity.
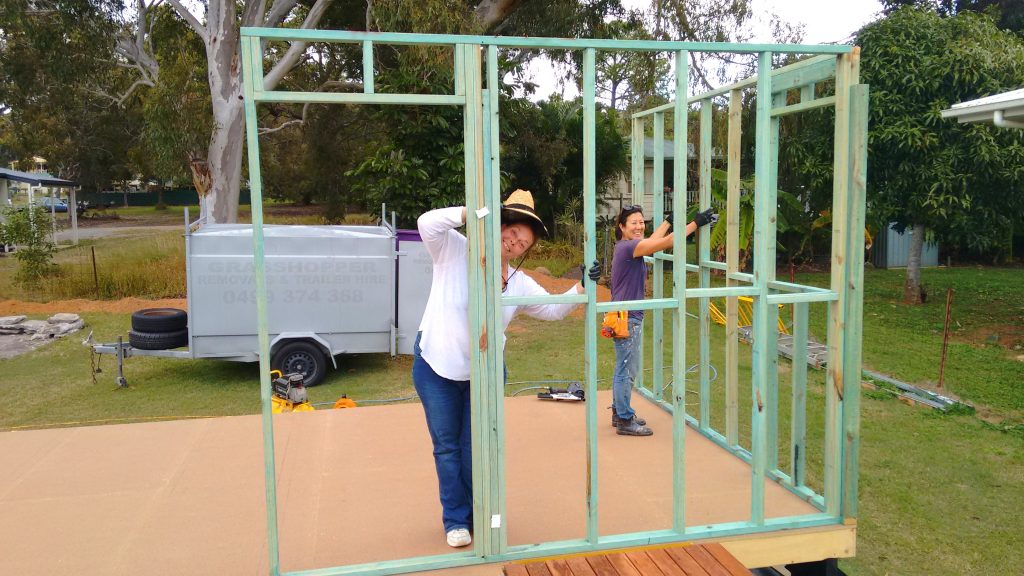
Our three wonderful framing crew got the walls all stood up Saturday.
Standing wall frames is FUN!
And we got the trusses up yesterday.
Trusses are fantastic pieces of structural elegance. Incredibly light, strong and easy to install.
We’ve now got lots of bracing and tie-down details to complete before we can put the roof on, hopefully towards the end of next week.
Stay tuned, we’ll keep you posted with our fingers crossed for good weather in the meantime.
As mentioned in last week’s newsletter, Cintia and I are up in Queensland working on an affordable housing project… by that I mean we’re trying to build a house that we can afford because we certainly can’t afford one in the Southern Highlands.
We found a wonderful place called Russell Island with cheap land, a very relaxed and friendly atmosphere and easy access to Brisbane and the Gold Coast. Now, after typical delays with councils, permits, etc, we’ve started building.
We were greatly blessed this week with an unexpected visit from our good friends Glenn and Lee Robinson from Bundanoon who popped over from the mainland in their campervan and very kindly gave us a hand for a couple of days. It was great to have their help and fun to show some friends around the island. Thanks guys!
We’ve also been closely supervised by the strangest and most enigmatic of the island’s residents, the Curlews.
Cintia working on the floor framing with the help of a couple of Curlews.
They really are odd creatures. These two spent a whole afternoon hanging around Cintia’s feet, apparently completely un-phased by our power tools and hammerings, and hissing at me every time I got too close. They sneak up on you and stare at you with unblinking eyes which is a bit creepy at first but we’re getting used to them… and they to us apparently. At night they make very loud and mournful moaning and wailing noises which would completely freak you out if you didn’t know what it was. All in all they’re a mysterious and constant presence which takes a little getting used to but we’re growing to like it and feel like it’s part of the Russell Island Experience.
Today we finished the floor framing which is all made of LVL’s (Laminated Veneer Lumber) bolted to steel ‘stumps’ set in concrete. Our trusses and frames are due on Thursday next week. That gives us a few days to fill in so we might lay the deck if the weather stays nice. We also have to lay the particle board flooring but I want to wait until the day before the frames come so it’s not out in the weather any longer than necessary.
Photo taken this afternoon of the floor framing completed.
That’s the progress so far. Thanks for reading… we’ll keep you posted.
It’s been nearly a month since I wrote our last Newsletter. That’s because Cintia and I are up in Queensland working on our very own affordable housing project. Don’t get me wrong, we love living in the Greeny Flat and we have a wonderful community of friends and family in the Southern Highlands of NSW. We’re not about to leave any of that behind, but we can’t afford to buy or build a house in that area. It’s just too expensive… prices have more than doubled in the last five years putting property way out of our reach.
In fact the least expensive vacant lots in our area are currently selling for $350,000. So you can imagine how interested we were when we heard you can buy a…
Vacant Lot 35km from Brisbane CBD for $30,000
That’s right… less than 1/10th of the price!
When we heard about this our first thought was, “That sounds way too good to be true. There must be something seriously wrong with it”. I imagined some sort of toxic industrial site out to the west of Brisbane where it would be unbearably hot in the summer, cold in the winter and with no access to public transport or services.
Still, for that price we thought it was worth checking out, so early in the new year we came up to have a look and found that the reality is a very different story. In fact what we ‘discovered’ is a delightful place called Russell Island in Moreton Bay, about half-way between Brisbane and the Gold Coast.
Russell Island is one of the Southern Moreton Bay Islands.
The Southern Moreton Bay Islands, including MacLeay, Lamb, Karragarra and Russell Islands are serviced by regular car and passenger ferries from Redland Bay. Quite a few people commute to jobs on the mainland but you could easily live on Russell Island and never leave. There are shops, restaurants, hardware stores, police, ambulance, doctors, a library, a primary school, various clubs and sporting associations, a community centre, etc, etc. Best of all there is an almost perfect climate and a really laid-back and friendly island ‘vibe’.
And yes… land is THAT cheap here. In fact there are plenty of vacant lots for sale in the remoter parts of the island for under $20,ooo.
So What’s The Catch?
Well… as the locals like to say… ‘the catch is a bucket of prawns and some flathead.’
And that’s about the strength of it. So far we haven’t found anything not to like about the place. Sure, the commute by ferry is not for everyone, but we love it. It does make it a bit more expensive to get building materials over to the island but that’s more than made up for by the ridiculously reasonable price of land.
We ended up buying a cleared and level 570sqm lot just 400m from the supermarket and 600m from the ferry landing for $37,000. There are plenty of cheaper lots available but we wanted land within easy walking distance of all the island’s services so we were willing to spend a bit more money.
We now have our building approval which was somewhat complicated by the fact that there is no sewer service on the island so we had to have a waste-water treatment system designed and permitted before we could get approval for the house. But that’s all done now and we have just started the construction of the house.
It’s not going to be anything particularly energy efficient. The climate here is so mild all year round that you really don’t need to go to too much trouble in order to stay comfortable. Our primary focus for the project is affordability. We’re taking advice from local builders as to what are the best materials and techniques to use to keep costs down and still create a comfortable, durable, practical and liveable dwelling that suits the climate and the island lifestyle.
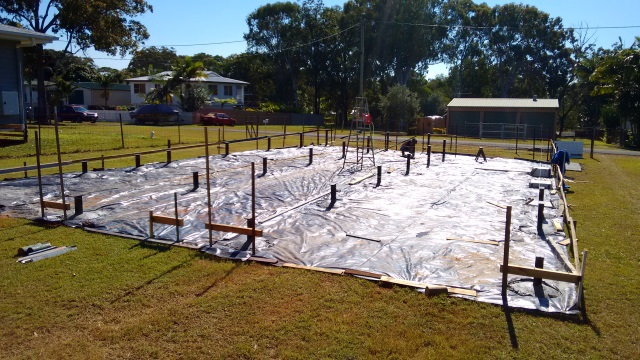
I’ll write more about the details in coming weeks. For now, here’s a picture of the progress so far. Our ‘stumps’ are in and we’ll be taking delivery of the floor framing materials on Monday then its ‘off to the races’.
Building up off the ground on steel ‘stumps’ will allow summer breezes to move all around and under the house to help keep it cool.
A bit over a year ago I made a trip down to Sydney to do an Energy Assessment on an existing house in Epping. Probably built around 1950 on a west-facing site, this house had a tendency to get unbearable hot in the summer time and uncomfortably cold in the winter. Among a long list of recommendations on how to improve the comfort and energy efficiency of the house I suggested that adding double-glazing to some or all of the windows would be beneficial.
There are a few ways to retrofit double-glazing into an existing house. The best (and most expensive) way is to completely remove and replace the existing windows, frame and all. This is what we chose to do on the cottage next to the Greeny Flat as documented in the following video.
This is pretty big job which made sense for us because we had completely removed the old fibro cladding and wanted to ensure that there was no painted timber exposed on the outside of the cottage (because low-maintenance and durability were priorities for us). So we replaced the single-glazed timber windows with double-glazed aluminium ones.
Another (somewhat less expensive and disruptive) option is to just replace the glass in the existing window frames. There are a number of companies that offer this service and one that looks very promising to me is called ‘Twin-glaze‘. They have a very clever system which allows them to remove the glass from an aluminium window frame and replace it with double-glazing without removing the existing frame. I haven’t used this system so I don’t know how well it works or how much it costs and I’d love to hear from any readers who have used it.
A third option is to add a second pane of ‘glass’ (usually it’s actually perspex) to the inside of the existing window frame. The most well-known company that offers this service is called ‘Magnetite‘ because they use a magnetic strip around the edge of the perspex to hold the double-glazing tight to the existing window frame. On my sister’s house in Canberra she used a combination of total replacement of some of the larger windows (and sliding doors) plus adding ‘Magnetite’ panes to the rest of the smaller windows and to the skylights. She’s very happy with the result but it certainly wasn’t cheap.
For the house in Epping, the owners, Margaret and Brendan, took a similar approach. They replaced some of the windows completely but decided to add double-glazing to an existing pair of french doors that open out to a west-facing deck. They got a quote from Magnetite but thought it was more than they were prepared to spend. So they figured out a way to do it themselves.
Here’s what they have to say about their DIY double-glazing.
You may recall when you came to our house the French doors in our lounge room. We got a quote from Magnetite to retrofit double glazing and total cost was $1529. We decided that we would have a crack at doing this ourselves. After a couple of hours work the job was completed for a total cost of $352. A local plastic company supplied 3mm clear acrylic cut to size and the magnetic tape and steel tape for secondary glazing was supplied by a UK company (couldn’t source it locally). I will note that the Magnetite product uses 4.5mm acrylic but I’m happy with the end result and the significant cost saving.
DIY ‘double glazing’ retrofit photos are attached. We attached the magnetic tape to the acrylic then stuck the metal strip onto the tape. Then we just removed the backing to attach to the French doors, as this made it much easier to manage positioning.
Margaret and Brendan’s French Doors with their DIY Double-glazing installed.
If any of your readers are interested the supplier of the tape is Direct Products UK (I purchased via ebay). The item was magnetic tape & steel tape secondary glazing 30m kit for white window frames.
We are also very happy with our solar installation and are pleased to see that after charging the PHEV during the day we are still exporting to the grid.
With the Enphase monitoring we get the power usage and net energy figure.
A screenshot of their ‘Enphase’ solar power system monitoring.
Also we finally received our Flir thermal camera (a very long process to get one into Australia, and I had to sign my life away to say that it wasn’t going to be used in US etc). So we have been looking at the outcome of our on-going renovations (have started recladding with insulation & sarking & have also installed 6 new double glazed UPVC windows).
Congratulations Margaret and Brendan! Upgrading the energy performance and comfort in an old house can be a real labour of love (not to mention quite costly). They’ve got plenty more to do but they’ve already achieved a fantastic amount (even buying their own infrared camera to help them identify areas of heat loss or gain) and, in the process, figuring out how to install DIY retrofit double-glazing for a VERY reasonable cost.
Thanks very much for sharing this information with the rest of us.
A Nice Bit of Good News
South Georgia Island sits just above the Antarctic Circle in the Southern Atlantic Ocean (Image Source: BobMetzler.com)
To finish up this week I’d like to give a shout out to my brother George who has been deeply involved over the last five years with an ambitious and challenging effort to eradicate rodents from South Georgia Island. This was the largest rodent eradication project ever attempted and has just been declared a success.
The task of the project was to cover 1,087 km² (419 mi²) – an area eight times larger than any previous rodent eradication effort that included some of the harshest, most mountainous terrain imaginable….
South Georgia Heritage Trust is delighted to declare that its Habitat Restoration Project is complete and that invasive rodents have been successfully eradicated from the island.
Congratulations George (and the rest of the team), we’re very proud of you.
Hello again. This week we have some exciting news… we’re making the Greeny Flat available to rent from the 9th of June until the end of August.
Cintia and I will be away working on an affordable housing project in Queensland so we’ve listed the Greeny Flat with the wonderful team at Highlands Property in Bowral.
Here is a link to the listing for anyone who might be interested.
The listing shows the location and some photos of the place (click on the image in the top right to view a little slide show.
Please share this link with anyone who might like to spend the winter in the beautiful Southern Highlands and/or experience life in an energy-positive eco-cabin or just needs a place to live for a few months.
Thanks for your help… we really appreciate it.
Another Example of a ‘Sustainable’ Subdivision
In our Newletter back on March 16th I wrote a bit more about how most subdivisions are typically designed and built with little or no thought to sustainable concepts like energy and water conservation, natural habitats or bringing communities together. I also described how the ‘Design Guidelines’, covenants and controls can actually make it difficult or impossible to build a good passive solar home in one of these developments. But it doesn’t have to be that way. With careful thought and planning a subdivision could actively encourage energy efficiency, water conservation, preservation of natural habitats and a healthy community.
In that Newsletter I mentioned one such development called Khancoban Alpine Estate and this week I’ve discovered another one called The Cape which is currently under construction at Cape Patterson on the Victorian coast.
Artist’s Impression of The Cape development.
Here is a bit of an excerpt from their website…
All homes will feature proper orientation, shading, glazing, insulation and more, to ensure year round comfort and reduce living costs. Your home will retain warmth in winter and stay cool in summer, minimising the need for cooling or heating.
The use of rainwater will increase the availability of clean, fresh water in our community. In addition to mains water, all houses will feature at least 10,000 litres of rainwater storage for use in gardens and toilets, helping to create year-round water security. Excess stormwater will be redirected to collection ponds and filtered back through vegetation into groundwater and natural wetlands.
Each house at The Cape will have a minimum of 2.5 kilowatts of solar energy. Powered by the sun, the community will be capable of creating an annual surplus of clean energy. Electric vehicle charge points are also available for residents who want them.
As a resident at The Cape, you will have the opportunity to grow your own produce in our specially designed gardens if you choose. The café at The Cape’s Community Centre will also offer our residents delicious meals made from the freshest, locally grown produce.
Sounds pretty good doesn’t it?… Don’t you wish every subdivision was designed and built this way? Perhaps, one day, they will be.
Lots to get through this week so I’ll try to be brief.
Firstly just a quick reminder that we’re having our 4th Earth Day Party at the Greeny Flat on Sunday from 4-7pm. Everyone’s welcome… more info in last week’s Newsletter here.
Should you monitor the output from your solar panels?
The answer is an emphatic YES! In fact I would go so far as to say you MUST monitor your solar power system and here’s why…
Our solar power monitor at noon on a good sunny day last week.
We’ve been monitoring our solar power system since it was installed four years ago. It’s rated as a 3kW solar system but you’ll never get the full rated production from your solar panels. When it was first installed we found that it could produce 2.7kW on a good, cool, sunny day. (Cool is important because solar panels produce less when they get hot). But lately I had been noticing that our power production seemed to have dropped off a bit. So earlier this week I took a closer look and, sure enough, the photo above shows that we were only getting less that 2kW out of the panels on a cool, sunny day at noon.
So I went out and had a look at the panels and this is what I saw…
The culprit… or so I thought.
Yep, there was a gorgeous big bird turd right in the middle of one of the panels and I thought, ‘Ah Ha! That must be shading one of the cells and taking down the production of the whole string’. (FYI – our solar panels are attached to what’s called a ‘string’ inverter which means that, if one of the cells of one of the panels is shaded, it reduces the production of the whole string – the way to avoid that is with ‘optimisers’ or microinverters but that’s a whole other discussion). Anyway, I jumped up a ladder, carefully removed the offending excrement and ran back inside to find…
Not the culprit apparently.
… it made bugger all difference. So I jumped back up the ladder and had another look.
These solar panels look clean to me.
The panels looked pretty clean and it took me a while to spot the problem…
The new culprit!
Along the bottom of each panel (this photo was taken from the top of the roof) was a little row of lichen growing. The aluminium frame around the edge of the panel creates a little lip that catches enough dirt to provide a place for lichen to take hold. And, as you can see, these little bits of lichen are starting to cover a little bit of the edge of the solar cells. A little bit of lichen shading a little bit of a few cells of each panels… could this be enough to reduce our total production so dramatically? There was only one way to find out…. clean the panels!
Pressure washing to worst of the dirt and lichen off the panels.
The important thing when cleaning solar panels is not to scratch the surface of the glass because that would also reduce the production. A pressure washer is a good tool to get most of the dirt and lichen off the panels without risking any scratches (although this article from Solar Choice says not to use a pressure washer because you risk cracking the glass). I definitely do not recommend that you do this yourself unless you have a lot of experience working on roofs and some good safety equipment. The water from the pressure washing gets everywhere, including the roof that you’re standing on, and makes everything very slippery. Anyway, I managed to get it done but I noticed that there were still some spots and bits of lichen root clinging to the glass.
Gently scrubbing the solar panels with a very soft broom so as not to scratch the glass.
So I found a very soft, clean broom (so as not to scratch the glass) and gently scrubbed the remaining spots off with a mixture of sugar soap and bleach. This was even more dangerous because the soap made the roof I was standing on even more slippery. Once again, I do not recommend doing this yourself.
After a thorough rinsing to remove any soap residue I was eager to see what the monitor had to say…
That’s more like it!
…and lo and behold, our solar production had shot back up to 2.6kW. So, by cleaning the panels we were able to get about 700 more watts out of the panels. At a guess that will add up to about an extra 2.8kWh per day or 1000kWh per year. That’s worth at least $100 (up to $250 depending on how we use our solar power). So cleaning the panels was definitely worth the effort.
But the main point I’m trying to make is that, if we hadn’t been monitoring the production of electricity from our solar power system we would not have known that we had a problem. The panels looked fine from the ground but, because the monitor told us they were not producing properly, we were motivated to look more closely and to find the lichen problem and fix it.
So, getting back to the original question… should you monitor the output of your solar panels… the answer is ABSOLUTELY!
14% of Solar System may not be working at all
According to this article from Solar Analytics, ‘more than half of Australia’s residential solar systems perform below the standard they’re supposed to. And even worse, about 14% of the country’s solar systems develop a major fault every year and stop working altogether.’
Unless you have a monitoring device, how would you know if your solar system is working at all? One way is to look closely at your electricity bills. Another is to look at the digital display screen on your inverter or at the reading on your electricity export meter. But the best way is to install a monitoring device. I have a Wattson meter but they have gone out of business. Friends of mine have various different monitoring systems including ‘Efergy‘, ‘Smappee‘ and ‘Solar Analytics‘. There are plenty of others but my advice is, it doesn’t matter which system you choose, just get one and pay attention to it. You’ll be glad you did.
Solar for Pensioners
In our Newsletter on March 30th we talked about how it’s a great time to install solar due to the excellent financial returns. One of our readers (and neighbours), Phil, sent the following response outlining how solar can be even more beneficial for pensioners…
‘…people on part pensions currently have their pensions increased (or decreased) with every $1000 movement in their deemable assets. What this means is that if a pensioner spends, say $6000 on a system, their assets go down by $6000 which increases their pension by $468 per year (6 x $78), so after about 13 years the Govt has paid them $6000+ ie paid for the solar. Plus they have an asset which increases the value of their home. They will of course lose the earning capacity of the $6000 but even if it could have returned 4%, they are still ahead by 3.8%.’
So there’s another hidden benefit of rooftop solar… thanks Phil.
Exhibition Success
Finally, thanks to everyone who came along to our ‘Celebrating Clay’ exhibition. The exhibition as a whole was beautifully presented and Cintia’s ceramics and my photos were very warmly received. We really appreciate the support.
Some of the 10 exhibitors at the ‘Celebrating Clay’ exhibition last week.