Last week I wrote about a couple of revolutionary projects that might lead us to rethink the way we design and build shelters. Meanwhile, during this year of monitoring and evaluating the performance of the Greeny Flat we are doing a lot of thinking about what we could have done better in the design and construction of this little house. I’m pleased to report that there is very little that we would change if we were starting again but there is one major thing that we would do differently.
No Solar Hot Water
This might come as a surprise to some readers but we would very likely not install a solar hot water (SHW) system, certainly not a split system like we currently have, and definitely not anything made by Apricus.
What’s wrong with a Solar Hot Water System?
The main problem with the particular SHW system that we purchased is that it was extremely expensive. After much deliberation we selected a ‘top-of-the-line’ split system with an Apricus APKR-20 Evacuated Tube collector, an Everlast Series 2000, 160ltr storage tank, a DeltaSol BS/4 Controller and a price tag of about $6250. There a many cheaper systems on the market and, in future, I might consider using a less expensive option, at least to pre-heat our water. But, if you’ve been following the results of the Greeny Flat experiment , you’ll know that we are making way more energy than we are using. What we could really use is a way to store some of that energy during the day for use at night. The simplest way to do that would be to heat water. If we didn’t have this super-fancy and expensive solar water heater, we could simply use our excess electricity to heat a tank full of water during the day for use at night. In effect this would still be a solar water heater we would just be converting the sunlight to electricity first, then the electricity to hot water. This would be somewhat less efficient but much simpler and less expensive and it would help us to reduce the amount of electricity that we export to the grid. We only get paid 8c/kWh for what we export and we pay 22c/kWh for what we import so it’s better for us to make use of the electricity directly rather than export it. In short, the SHW system we have is way more complicated and expensive than it needs to be.
What’s wrong with a split Solar Hot Water System?
There are a lot of different types of SHW systems which are described in detail in the Wikipedia article on solar water heaters. In Australia there are two main types available: ones that have the tank attached to the top of the collector panel (called ‘close-coupled’ systems); and ones that have the tank separate from the collector panel (called ‘split’ systems). As you can see from the images below, it’s easy to tell the difference when you see a SHW system on a roof because the close-coupled system has a big tank on top and the split system doesn’t.
 Split SHW system with ‘flat plate’ collector and tank on the ground. Note the complex system of pipes, wires, pumps, controllers, etc, required to make this work.  Close-coupled SHW system with evacuated tube collector. Note the simple and natural ‘thermosyphon’ system that makes this work. The other thing you can glean from these images is that the split system requires a complex arrangement of pumps, controllers, valves and piping to make it all work whereas the close-coupled system is much simpler and works by the natural tendency of hot water to rise (called the thermosyphon effect). So, in future projects I might consider using a close-coupled system to pre-heat the water but I’d be very reluctant to use a split system again.
What’s wrong with Apricus?
Apricus has a very good reputation as the Australian leader in SHW technology. Their website makes them sound like a wonderful company to deal with. Their ‘Core Values’ are listed as:
- Building strong relationships with customers.
- Providing the highest quality product.
- Providing the best possible support.
- Having the “good bloke” factor; Going above and beyond for our customers.
Sounds good doesn’t it? The trouble is that, at least in our experience, they haven’t lived up to any of these promises. In fact:
- There are some serious shortcomings in the design of the product, particularly the lack of a user interface for monitoring and control of the system and the poor design of the smaller storage tank which we were forced to use due to the low height of the available space above our bathroom.
- We have made many attempts to raise these issues with Apricus and have met with a very poor response.
- Their customer service is almost non-existent.
- Most of the ‘good blokes’ at Apricus that I have tried to contact haven’t even bothered to reply. The ones that have responded have been very slow and their responses have generally been unsatisfactory.
In short, I would never use an Apricus product again.
So what would we do next time?
Next time I will most likely do the simplest thing possible that would still allow us to use the sun to heat water. That probably means that I would simply have a good, old-fashioned, electric tank water heater with an element. This is simple, tried and trusted technology that every plumber understands, can install and repair. It is also silent and has no moving parts so requires minimal maintenance. I would set this up on a timer to run between 10am and 2pm every day which is the period of maximum production from our solar power system. Since we seldom use any other electricity during the day this would allow us to store a lot of our excess power in the form of hot water. To summarise, such a system would be:
- Inexpensive to install
- Inexpensive to operate
- Silent
- Easy to maintain
- Easy to repair
- Easy to understand
If I had a good place for it with easy access I might consider using an inexpensive, close-coupled SHW system with a flat plate collector to pre-heat the water on sunny days. Of course on cloudy days we would be using grid power to heat the water but that is true now with the expensive and complex solar hot water system that we currently have.
And so we live and learn…
During the last week I’ve received a couple of emails containing links to stories about some innovations that could really cause us to rethink the way we design and construct buildings.
The first of these is called The Cubitat. It’s a 3m x 3m x 3m cube which turns the idea of a house inside out. Designed by Toronto-based Urban Capital it fits all of the essential functions of a house, i.e. kitchen, bathroom, laundry, bedroom, entertaining area and storage cupboards into a central core that looks a bit like a rubic’s cube. The idea is that you can plonk this thing into any empty space (like a disused warehouse for example), plug it in and voila, you have a house.
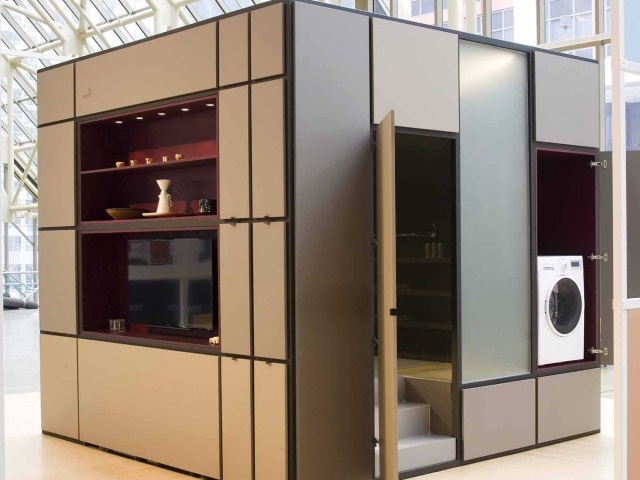 The Cubitat by Urban Capital, Toronto. Check out either of the links below for more details about the concept. What I find interesting about it is the way it seems to ask the question, ‘What is a house?’. We typically think of a house as shell with all of its functional elements inside and focused inwards. The Cubitat puts everything except the bathroom on the outside focused outwards. It’s an extremely efficient use of materials and space and makes me rethink what is possible in design.
http://www.gizmag.com/cubitaturbancapital/35763/utm_source=Gizmag+Subscribers&utm_campaign=6730bc432-UA-2235360-4&utm_medium=email&utm_term=0_65b67362bd-6730ebc432-91792929
http://news.domain.com.au/domain/real-estate-news/china-3d-prints-mansion-and-apartment-block-20150122-12vkri.html?rand=1421894371139
Even more challenging to our current way of doing things is the idea of 3D printed buildings. Of course I’d heard about the concept but thought it was still years away. Not so! It’s already here, or at least in China. Check out the following article, watch the video, then tell me this won’t change the way buildings are conceived, designed, and built in the future. It boggles my mind to think about what possibilities this might unlock.
http://news.domain.com.au/domain/real-estate-news/china-3d-prints-mansion-and-apartment-block-20150122-12vkri.html?rand=1421894371139
http://www.cnet.com/news/worlds-first-3d-printed-apartment-building-constructed-in-china/
It’s particularly encouraging to note that these buildings were printed with recycled waste material. It’s reassuring to know that, from the very outset, this technology is being used in environmentally responsible ways.
 3D printed apartment building in China
January 22nd marked the end of nine months of recording the performance of the Greeny Flat in its first year. As you can see from our Results Table, things are going very nicely and we are on track to meet our original goals.
To sum things up, overall:
- we’ve exported (put into the electricity grid) more than three times as much energy as we’ve imported (taken from the grid)
- we’ve used about 6700 more litres of tank water (harvested rainwater) than town water
- and the interior temperatures have stayed pretty comfortably within a 16degC temp variation compared to an exterior temperature swing of 45degC.
Five times more Export than Import over the last three months.
During the colder, less sunny months (May to October) we managed to consistently export 2-3 times as much power as we imported. Still we’ve been quite amazed to see that over the last three months (Nov to Jan) we’ve exported 1187kWh and imported only 228kWh. In other words we’ve put more than five times as much electricity into the grid as we’ve taken out… wow!
The challenge for us going to into the future will be to find ways to use that excess energy to replace more of our overall fossil fuel consumption. We don’t plan to make any big changes until we’ve completed a full year of testing the Greeny Flat. Earth Day this year (April 22nd) will mark the end of our first year and at that point we’ll be looking to take the next step(s).
We’ll be looking closely at our food choices where there is a great deal of hidden energy consumption but the obvious thing for us to do next will be to try to replace more of our car usage with sustainable forms of transportation. We already walk or ride our bikes for a lot of the things we do in town like shopping, going to the post office, going out to a restaurant, etc, but one of the disadvantages of living in a semi-rural area is that things are pretty spread out and there is not a consistently reliable public transport system.
For some of my work I have to drive to the next town. My parents live about 15km away on the other side of a pretty big hill so riding a bike there would be a challenge. Even going to our tango classes in Bowral would require a pretty fair commitment on a bike. So we’re looking into options for either an electric car or electric scooters that we could charge from our solar power system and use for a lot of our local running around. One possibility might be for both Cintia and I to get something along the lines of the Mebike pictured below. This is an Australian designed, decal-assisted electric scooter which costs around $1300 new.
 The Mebike “Commuter” pedal-assisted electric scooter Alternatively we might look into buying an electric car (for a LOT more money) but my feeling at the moment is that battery technology isn’t quite up to speed yet although it will be very soon. I think in the next few years we’ll see tremendous advances in the area of electric vehicles so I’m inclined to not spend too much money right now. Scooters would be a decent (and affordable) solution for now and, hopefully, in a few more years we’ll be able to buy something like the UNSW “Sunswift” solar powered electric car pictured below. Affectionately known as Eve, she has a range of 800km and a top speed of 140km/h… not that we need to go that fast but she does look like fun. We’ll keep you posted as things develop.
 University of NSW’s world record setting “Sunswift” electric vehicle.
In our last Newsletter I wrote about the can of worms I dived into when I began looking into Switching To Green Power. Well things got even wrigglier when I received the following response from one of our readers. Mary is an energy auditor and consultant from Brisbane and she writes; ‘Hi Andy
I was interested to read your news this week regarding electricity. I too have chosen AGL but have increasingly become concerned with my choice. But what provokes this email is your thinking to go with Click. I had a bad experience with them.
We have a house in Brisbane with solar panels on its roof since 2004. We are fortunate to be in the Qld Solar Bonus Scheme, and continue to be, with the house now leased out, and we bill the tenants when they draw excess from the grid.
We decided to go to Click as part of the “Big Switch” and right from the start it did not work. I am not a fan of monthly billing, and find it is an excuse for big companies to hold onto money that is generated from the power plants WE OWN on our roofs. So, for us, what happened with Click was that it ended up with being over $1000 in credit which they would not release, and we had to go to the Ombudsman to get our money back.
Unfortunately it all went very badly for us then. We went back to AGL, who treated us like a completely new customer, and we lost power for a full weekend, at a critical time, and it took a lot of threats to get the electricity back on, on the Monday. We also got cut off the Solar Bonus scheme, which was wrong, as we had not changed names, or discontinued supply, only changed retailers. That took another massive amount of time,plus a statutory declaration, to get that reinstated.
So, now that we have tenants in the house, and live interstate, when I read about AGL I have made the decision that for now we will stay with them as the retailer as we cannot risk the tenants losing power, and trying to deal with it all from Sydney. AGL too, suddenly changed us over again to monthly estimates and it was impossible to manage as a landlord, and they hold over the credits until the next bill. We must have a thick file with them, as I have just had to get billing changed back to quarterly, only on the quarterly read, credits to us, excess billed to the tenants. So with Click, if you do go with them, find out how they pay the credits, and if you can get it in writing.
I realise that these issues are different for you, but just wanted to tell you to be wary going with Click.
Keep up the great work, and writing.
Best wishes
Mary’
What Mary is referring to is the policy of Click Energy (and others) to take a $50 per month pre-payment on their customers electricity bill. Theoretically this will be reconciled at the end of each quarter and, if your account is in credit, they will not deduct $50 the next month. But it sounds like, at least in Mary’s case, they simply kept on deducting $50/month regardless of the balance of the account.
I’m very glad to have received this warning from Mary before I signed up with Click. Now I’m not sure what I’ll do but I’ll probably take another look at Diamond Energy who got the highest rating from Greenpeace and who source all their energy from renewables. The cost for us would still be less than we are paying AGL for GreenPower and Diamond Energy do not require monthly prepayments (as far as I know). I’ll keep you posted…
Over the last couple of weeks I’ve described some of the details of our solar power system and our surface mounted electrical system. All of this writing about electricity got me thinking about the source of the electrons so I finally got around to investigating our options for Green Power. From the beginning of the Greeny Flat experiment I’ve been aware of the fact that, although we are making energy from a renewable source (solar) and putting more energy into the grid than we are taking out, we are still using some energy that comes from non-renewable (fossil fuel) sources like coal-fired power plants. It’s been in the back of my mind to investigate switching to Green Power for at least the last nine months but I’ve only just found the time to really look into it… and what a can of worms it has turned out to be!
Green Power is defined by the official Australian Government website as ‘a government managed scheme that enables Australian households and businesses to displace their electricity usage with certified renewable energy, which is added to the grid on their behalf’. In practice, what this means is that we voluntarily pay a bit more for our electricity in order to support a transition to renewable energy on a national scale.
‘By purchasing GreenPower, households and businesses commit their GreenPower Providers to purchasing the equivalent amount of electricity from accredited renewable energy generators, which generate electricity from sources like wind, solar, water and bioenergy.’
We built the Greeny Flat because we believe that the time has come to move towards a fossil free future, so it seemed obvious to me that the energy we need to take from the grid should be coming from renewable sources. After almost nine months in the Greeny Flat we have exported to the grid about four times as much energy as we have imported from it. So we are well and truly energy positive. When the sun is shining and our solar power system is making more electricity than we happen to be using at the time, we are contributing our own ‘green power’ to the national electricity grid. The trouble is that, when the sun isn’t shining and our solar power system is not making electricity, we are importing the electricity we need from the grid and, in NSW at least, the majority of that electricity is coming from coal-fired power plants. This means that we are still contributing to global warming and supporting the coal industry… something we’d rather not do. Buying Green Power is one way that we can support a move away from coal towards a renewable future.
The first step for me was to contact our current electricity provider, AGL, to see what they had to offer. We signed up with AGL from the beginning simply because the existing house on this lot was with them and it was simple to add the Greeny Flat. It turns out they have a plan called ‘Green Choice’ which allowed us to switch to 100% Certified Green Power by simply making a phone call and agreeing to pay an extra 5.5c/kWH for the electricity we take from the grid. Since the Greeny Flat is very energy efficient we only import about 300kWh each quarter. This means that buying Green Power will only add about $16 to our electricity bill each quarter so, as a simple first step, I signed up for AGL’s ‘Green Choice’ option.
However in the process of looking into our Green Power options I came across Greenpeace’s ‘Green Electricity Guide’ and that really threw the cat amongst the pidgeons.
Greenpeace developed The Green Electricity Guide ‘to help inform Australians about which electricity retailers really are as ‘green’ as they say they are.’ Below is a screenshot from The Green Electricity Guide website page for New South Wales. Down the left hand side you can see all of the companies that provide electricity in the state ranked (by Greenpeace) from ‘greenest’ at the top to ‘dirtiest’ at the bottom based on the following criteria:
- Investments in fossil fuels or renewables
- The carbon emissions intensity of assets
- Support for – or hostility to – Australia’s Renewable Energy Target
- Solar offers
- GreenPower products
- Whether or not they invest in coal seam gas or other unconventional gas
- Commitment to not buying electricity generated by burning native forest products
 Greenpeace’s Green
Electricity Guide ranks the available suppliers on the LHS based on their Renewable Energy Credentials If you click on any of the company logos you get more detailed information each company’s performance under the above criteria. For example, below is what the site has to say about our current provider, AGL… and it’s not a flattering assessment calling AGL ‘the single largest emitter of carbon pollution in the country.’
 Greenpeace’s scathing assessment of AGL’s green credentials. Given our environmental philosophy we really don’t want to be supporting the single largest emitter of carbon pollution in the country. But deciding which of the other companies would be the best choice for us proved to be far from simple. So I decided to compare the cost of the Green Power offerings from all of the companies listed in The Green Electricity Guide. This turned out to be an incredibly complicated and confusing process because it’s almost impossible to compare apples to apples with their different plans. No two companies on this list structure their electricity plans in the same way. They all offer slightly different options. Some have a single rate for all of the electricity used, others have one rate for the first 519kWh/quarter and a higher rate for the rest. One company might charge a certain rate for the first 9kWh/day and a lower rate for the rest. Another company might offer a 3% discount off the usage and supply charges if you pay you bill on time while the next offers a 7% discount (but only off the usage charges) and a third offers a 15% discount off the total amount of the bill after the solar feed-in tariff has been deducted. In short I became extremely confused very quickly. How on earth could I compare these ridiculously complicated variations?
I decided to put together a spreadsheet listing just the 100% Green Power offering from each company (if they had one) based on the cost per day for an average day at the Greeny Flat. Before I show you the results I’d like to point out that the Greeny Flat is a highly unusual case in that we import a very small amount of energy from the grid (3.31kWh/day on average) compared to a typical house with two people in our area (about 15kWh/day according to our AGL bills). We also export a lot of energy to the grid (11.26kWh/day on average) where a typical house without a solar system exports none. So please understand that the results presented here are specific to the Greeny Flat and would not apply to any one else’s house.
In the following chart I’ve listed each of the NSW electricity providers in order of the their ranking in The Green Electricity Guide along with the rates they charge per kWh (kilowatt hour), their daily supply charges, any discounts they offer, solar feed in tariffs (FIT), and other charges. I have only included the information that was relevant to the Greeny Flat otherwise this spreadsheet would have been enormous and taken a year to complete. For example I have not included the different rate you might pay for the first 7000kWh/year with one company versus the rate they charge for the remainder because we will never import any where near 7000kWh/year. All of this information has been distilled down to a Net Cost/Day based on our average import and export per day over the previous two quarters (i.e. Import = 3.31kWh/day and Export = 11.26kWh/day). And here is what I ended up with… (if this is too hard to read you can download the pdf version by clicking here)

I have put a green box around the Net Cost per Day column where you can see that the results range from a high of 200.23c/day with Power Direct down to 51.56c/day with Click Energy. Unfortunately, and for some inexplicable reason, Click Energy does not offer Green Power to their solar customers (ones with solar panels on their roof). I would have thought that the solar customers would be the first to want Green Power but with Click we can’t get it. However they do offer a 10c/kWh Feedin Tariff (FIT) which is the best of the lot and is especially beneficial to us because we export so much more energy than we import. Some of the companies don’t offer any FIT and so their net cost to us was much higher. Power Direct was the highest because, although they do offer a Feedin Tariff of 7.7c/kWh they calculate the price for Green Power based on an average house’s usage. Because we use so little this meant that the cost for us worked out to 67.62c/kWh… more than double any of the others.
Click Energy also received a ringing endorsement from The Green Electricity Guide which says it ‘is the outstanding option for those with solar panels on their roof’. It is a pity that they don’t offer Green Power to people with solar panels but there would be a way around that for us by using the ATA’s (Alternative Technology Association) Community Climate Chest. This is an alternative way of buying Green Power (as well as carbon offsets) without paying more to your electricity retailer. Their website offers various options for calculating and selecting the amount of Green Power you would like to buy and/or carbon emissions that you would like to offset. I ran the calculations based on our consumption at the Greeny Flat and found that it would cost us $58/year (or 15.89c/day) to buy 100% certified Green Power. When I added this to the Click Energy rate we ended up with 71.43c/day which is still significantly less than the 89.69c/day we are currently paying AGL for Green Power.
At this point I was feeling pretty pleased with myself. When I started looking into Green Power I felt like I had stepped into a minefield, but I had found a way to navigate through it and felt like a clear path had presented itself. So I was about to sign up with Click Energy and the Community Climate Chest when I got to thinking more about what exactly I was signing up for. As the Community Climate Chest website puts it; ‘In the case of GreenPower, your money is used to pay Australian renewable energy generators to feed power into the national grid to replace the energy that you take out.’ For anyone who doesn’t have a solar power system or who imports more electricity from the grid than they export to the grid this is a beneficial scenario. The money they pay for Green Power will go towards building renewable energy infrastructure, but they’re not actually buying electrons that were generated in a renewable way. They’re simply requesting that an equivalent amount of renewable energy be put into the grid to match the amount of energy they take out of the grid.
It finally dawned on me that, at the Greeny Flat, we are already putting more than three times as much renewable energy into the grid as we are taking out. In other words we have created our own Green Power system right here and we don’t need to pay someone else to do it.
So I will probably be switching over to Click Energy because they seem to be much more responsible than AGL and their rates are better. I will probably also sign up to the Community Climate Chest because I think it’s a good idea and I like to support the ATA. I will definitely sleep better at night knowing that we already have our own energy positive Green Power system operating every day here at the Greeny Flat so anything else we do is simply to support the cause.
For anyone reading this who does not produce more energy than they consume, I would recommend that you consider switching to 100% Green Power. The Abbott Government has chosen to support the coal industry at the expense of the Renewable Energy Industry despite the overwhelming evidence that this is an insane policy. So it is up to us electricity consumers to find ways to promote renewable energy. Buying Green Power is a good way to do this but be warned… the retailers do not make it easy to compare one company’s rates with another’s. Perhaps the simplest and most beneficial thing to do it to find a standard plan that you can afford from a company that you are comfortable with then use the Community Climate Chest to buy Green Power and offset your carbon emissions. I think that’s what I’ll be doing next week.
 The zincalume coated picture rail in the Greeny Flat doubles as a conduit for the electrical system One feature that most visitors to the Greeny Flat notice and comment on is our picture rail that doubles as a conduit for the electrical wiring in the house. For many years now I’ve been wanting to experiment with a surface-mounted electrical system rather than burying all the wiring inside the walls. I’ve always thought that it could make a functional and interesting feature and in the Greeny Flat I’ve finally had the chance to try it out. I have to say that we’re delighted with the results.
Why surface-mount the wiring?
The main reason to surface-mount the electrical system is so that it is easily accessible for future changes and upgrades. This is particularly important in a house like the Greeny Flat which has a cathedral ceiling and a concrete slab floor. Because we have no attic space and no crawl space under the floor it would be extremely difficult to make changes in the future if all of the wiring was hidden inside the walls. As it turns out, in our case we would have had the option to unscrew some of the plywood wall paneling to get to the wiring, but in most houses it would require tearing into the gyprock walls. This would entail a lot of repair work, dust and disruption. By surface-mounting the wiring in a conduit we’ve made it very easy to move a switch or add a powerpoint as needed at any time in the future. Even a complete rewiring of the house would be a relatively simple job when the wiring is so easily accessible.
I’ve always thought it was silly to hide all the plumbing and wiring inside walls where you can’t get to it. In commercial buildings it is quite common to run the services either on the surface or inside conduits that are readily accessible. This is because, in commercial buildings, it is often necessary to make changes as technology improves or the needs of the occupants change. So why not do the same in homes? For years now I’ve been looking for a ready-made system that could easily be adapted for use in homes but I’ve yet to find the right one. So for the Greeny Flat we had to invent our own which we based on a very old idea… the picture rail.
Why use a picture rail?
 A good old-fashioned picture rail. If a picture rail seems like a quaint and old-fashioned idea, that’s because it is. In fact almost all old houses built before about 1950 had picture rails in every room. The purpose was obviously to allow the occupants to hang pictures and mirrors wherever they wanted to without making holes in the walls… a pretty good idea really! The rail was also often used as a dividing line between paint colours (although not in the photo above). I’ve lived in many houses in both Australia and the US that had picture rails and I really like their practical functionality. You can still go down to any hardware store and buy the hooks that fit over the rail and the wires for hanging pictures.
For the surface-mounted electrical system in the Greeny Flat the picture rail has another significant advantage in that it allows the electrical conduit to go all the way around each room above the height of the windows and doors. I have heard about commercially available systems where the wiring is hidden in the skirting boards at the base of the wall but what do you do when you get to a doorway? You’d have to take the wires up and over the door and back down to the skirting board on the other side of the doorway. With a picture rail we don’t have that problem so the whole system is much simpler.
I’ll go into more detail about how we built the conduits below but, first, here are some photos that show different ways that we’ve found to use the rails. In these photos you can also see how we were able to run wires in round conduits down to switches and powerpoints or up to lights.
 Picture rail used to hang a Japanese fabric painting.  Picture rail used to hang a guitar.  Picture rail used as a ledge on which to sit a shelf made out of an old hollow-core door in our study. As you can see, there are many ways that we’ve found the picture rail to be a useful and practical addition to our home. Aesthetically we also find that it adds an element of interest as well as a visual break in the plywood walls, some of which are four meters high and might have been a bit overpowering without the clean line of the metal conduit to divide them. And, because the rail runs around all of the rooms except the bathroom, it provides a unifying element to the various spaces and between indoors and outdoors (where zinc coated steel is the predominant material).
How is it made?
 Detail showing the construction of the main conduit. As mentioned above, I have searched for an off-the-shelf product that would do what we wanted but so-far haven’t found what I’m looking for. So for the Greeny Flat we made it ourselves. The main conduit is made in two parts (see photo above). The first is a galvanised steel c-section that is commonly used for studs in steel-framed walls. This was relatively cheap and easy to get and is made of pretty thin steel (from memory it is 0.55mm BMT) which makes it easy to cut and drill as needed. It would have been nice to be able to simply use a second c-section that was slightly bigger as the cover piece to go on the face but, unfortunately I couldn’t find the right material. Most of the stud sections that are available off-the-shelf have holes drilled in them at regular intervals which was fine for the backing piece but wasn’t going to work for the face. We also wanted the finer look of the zincalume coating rather than galvanised and this wasn’t available off-the-shelf. Finally, we wanted to create a lip on the top edge of the conduit which would allow us to hang heavier things or to hide indirect lighting in the form of an LED rope light. So for all the above reasons we ended up having the face pieces specially bent up for us out of a slightly heavier zincalume coated steel. (We ended up using a 0.70mm BMT flashing material rather than the standard 0.55mm because we found that the lighter section wasn’t able to support the weight of our largest and heaviest pictures).
Once the backing section was in place we simply had to drill holes where required and install round plastic conduit down to each of the switch and powerpoint locations or up to lights and ceilings fans. Once all of the conduits were in place we ran the wires and, because the conduit is metal, we had to ground each section of the main conduit. Then we cut notches out of the face piece in order for it to fit around the vertical conduits (see photo below). For the picture hooks themselves we cut pieces out of the offcuts of the face flashing and bent them into the shape shown below.
 Picture hook made out of zincalume coated steel section. These hooks are inserted at the corners of the conduit (see photo below) and simply slid along until they are in the right spot. And that’s about all there is to it. We’re very happy with how the system looks and functions and when it comes time to make any changes to our electrical system we’re going to be so happy that we chose to surface mount everything where it’s easily accessible.
 The picture hooks are simply inserted at the corner and slid into place. Next week I plan to write about the confusing and complicated issue of switching to Green Power.
Everything is going very nicely at the Greeny Flat. Our passive solar shading is working well to help keep us cool on the hottest days. We’re lucky that we generally have cool nights in this part of the world. It allows us to open up the house at night and cool down the concrete slab which then works to keep us cool during the day.
We’ve had plenty of sunshine too so our solar power system is producing loads more electricity than we are using. A number of people have asked me for details about the system so I thought I’d better put it writing. To summarise, we have a 3kW grid-tied solar system with twelve 250W ‘Trina’ panels and an SMA ‘Sunny Boy’ inverter. The system was installed by ‘Evolved Electrical’ from Campbelltown and cost a total of $4,650.
 The Greeny Flat’s 12 ‘Trina’ solar panels are mounted on the garage roof. Our Solar Panels
Before settling on a system or an installer we had lengthy discussions with numerous companies and product reps about the best types of panels and inverters to use. Most of them agreed that ‘Trina’ panels were the best value for money. Others like ‘Sunpower’ have higher efficiencies and longer warranty periods as well as bigger price tags. ‘Trina’ seemed to be the best compromise between cost, quality, reliability and warranty. They come with a 10 year (workmanship) and 25 year (linear power output) warranty.
Trina panels are made in China. It would have been nice to use Australian made panels but we couldn’t find any through any of the local installers that we spoke too. We could have used panels made in either Europe or the US but they would have cost significantly more. Since our only option was to use panels that had been transported a long distance thereby supporting some other country’s economy we decided that it didn’t matter where they came from. So our choice was based on recommendations from ‘experts’ who all seemed to agree that ‘Trina’ were the best value.
 Our SMA ‘Sunny Boy’ inverter mounted next to the electrical panel on the back of the garage Our Inverter
We have an ‘SMA Sunny Boy – SB 3000TL-20’ inverter rated at 3kW. SMA inverters are made in Germany to a very high standard and come with a 5 year manufacturers warranty. Most of the installers we talked to recommended other brands like ‘Aurora’ as being the best value for money. In the end though we decided to spend a little more on the SMA because it is already set up to be connected to a battery storage system.
We don’t currently have battery storage because the price is still too high. But, hopefully in the not too distant future, we would love to be able to store some of our excess energy during the day for use at night. There is currently a massive amount of research and development going into energy storage systems and all indications are that within 3-5 years we should see some really good value options on the market.
Once that happens we will probably buy one. With the SMA inverter we will simply be able to plug it straight into the storage system and away we go. Most of the cheaper inverters do not have this capability built-in so we would have to switch inverters which would be an expensive proposition. So, for a couple of hundred extra dollars up-front we have a very high quality inverter that will likely save us a lot more than that when it comes time to buy an energy storage system.
Our Installer
Our system was installed by ‘Evolved Electrical‘ based in Campbelltown, NSW. The main deciding factor was price. Evolved’s price was significantly better than any of the other companies that we spoke to. We ended up paying a total of $4,650 and the next nearest quote was around the $7,000 mark. This did not include some extra work that we had to do to upgrade the existing electrical supply to the old house in order to be able to add the solar system.
If you are considering installing a system on an existing building, it is important to make sure that your existing wires and meters can handle the additional requirements placed on them by a grid-tied solar system. We ended up having to replace the electricity supply line from the pole across the street to the meter box because it was not a thick enough cable. We also had to add two new meters (one to measure the electricity we import from the grid and one to measure the electricity we export to the grid) and while we were at it we also chose to update the existing meters for the old house, the meter box (the old one had asbestos in it), and all of the wiring in the existing house.
Getting back to Evolved Electrical. They did a good job on the installation. They came when they said they would, got the job done in reasonable time, and did a good-quality, neat and tidy installation. In fact the only issue we have had with them was a paperwork one. They were supposed to have supplied us with an owner’s manual and certificates but so far, despite repeated prompting, they have not done so.
Regardless of the installer you use, I recommend that you do not pay the full amount of the bill until you are certain that every detail is finished and correct. In retrospect we should have withheld a small amount from our final payment until all of the necessary paperwork was completed.
Our Experience So Far
Apart from the minor issue mentioned above we have been extremely happy with our decision to go solar and with the system that we have installed. We spent about $300 extra to have the installers add a power metering device called a Wattson Meter which allows us to monitor both our usage and production of electricity in real time. If you are considering a solar system I highly recommend that you spend a bit more for something like the Wattson Meter.
 Wattson meter display showing current PV production of 2.245kW Not only does it help us monitor our day to day usage of electricity and see where we can use less. It also records our usage and production data so that we can review it on a regular basis. This allows us to learn about our overall patterns of energy use. It would also help to inform us if there was a problem with any of the electrical equipment in the house such as the solar power system, the electric booster on the solar hot water system, the water pump or the refrigerator.
 The Wattson meter records information on how much power is used and produced every day and when. Apart from anything else, it’s fun to be able to see graphs like the one below that show just how much more electricity we are making (green) than we are using (red)… gotta love that!
 Wattson Meter graph showing the total amounts of electricity used (red) and produced (green) in the Greeny Flat over the last eight months.
The Trouble With Cathedral Ceilings
Cathedral ceilings (sloped ceilings where the lining is attached directly to the underside of the roof rafters or battens) can be an attractive feature in any building and, especially in a very small home like the Greeny Flat, can help to create a sense of space by allowing for higher ceilings. However properly insulating and air-sealing cathedral ceilings can be a real problem. It can be very difficult to create an effective air-seal which can lead to substantial heat loss and, more importantly, to serious condensation problems within the roof cavity. Without a good air-seal warm moist air from inside can migrate up into the roof cavity and, unless the cavity is well ventilated (which can also be difficult in cathedral ceilings) the moisture can condense and create mould and rot problems. If the cavity is well-ventilated then the heat loss issue can be even worse.
The Sandwich Panel Solution
Sandwich (otherwise known as SIPS – Structural Insulated Panels System) panels are one possible solution to the problem. Generally SIPS panels have a polystyrene foam core which provides the insulation layer with two rigid layers glued to either side which provide structural strength and durability. These rigid layers can be made from a variety of materials including plywood, OSB, fiber-cement board, sheet metal, or corrugated metal.
The panels that we used for the roof of the Greeny Flat came from a company called ‘Versiclad’ based in Liverpool near Sydney. We used their ‘Corrolink’ 150mm panels which have flat, white Coloubonded steel on the underside, 150mm of foam in the middle, and corrugated Colourbonded steel on the top surface.
 Photo showing the ‘Sandwich’ construction of the SIPS panels in the Greeny Flat roof. Depending on your Wind Class zone these panels can span up to 7.5m so from ridge to gutter without the need for any other structural framing in the roof.
 Photo taken during construction of the Greeny Flat showing how the panels span from the ridge to the exteior wall.
Below is a link to a tech sheet on the product.
The foam material is expanded polystyrene. The rated insulation value on the 150mm panel is R3.6 but it will actually perform MUCH better than a framed ceiling with R3.6 batts for two reasons. 1) There are no thermal breaks throughout the entire ceiling whereas a framed ceiling has a thermal break at every piece of wood, and 2) there is much less potential for air leakage with these panels. They also have the advantage of not having a ceiling cavity so there is nowhere for condensation to accumulate and no organic matter to harbour rot or mould. So for cathedral ceilings they can be an excellent solution.
The price of the panels themselves can be quite high (we paid about $10,500 for the panels and flashings for our 72m2 roof) but you have to consider that a) they install very easily and quickly (as long as you have a good even plane on which to lay them) which can save you a fortune in labour and b) once they are up, everything is finished (structure, insulation, ceiling, and roof) and shouldn’t require any maintenance. Trying to get the same sort of performance with any other method would require a LOT of time and messing around so the final cost comes out about the same.
There’s a part of me that hates to use polystyrene because it is a petroleum-based product and, when combined with the metal on both sides, these panels have a very high embodied energy and carbon footprint. But I think their use is justified, especially in a cathedral ceiling situation, because of the energy and carbon they will save over the life of the building through savings in heating and cooling as well as in durability and low maintenance.
There are other companies that make similar types of panels but these were the only ones that I found that had a flat ceiling with no ribs or corrugations. This not only looks great but it makes it much easier to air seal around the perimeter.
 Photo showing the finished ceiling with the white metal underside of the SIPS panels and joints where the panels meet.
Since building the Greeny Flat I have discovered a company that makes entire little kit homes using these same panels. They are called ‘Shack In A Pack’ and their home kits are very reasonably priced. Their designs look very simple, practical and attractive so I went to view a display home at Unibuild in Albion Park. Apart from the fact that the display home there is poorly put together I thought the overall ‘Shack in a Pack’ concept was a good one and would be particularly well suited to a little beach house or holiday cabin. It felt a bit like being inside a big esky but a lot of that was because there were no furniture or personal touches. With some nice interior design and a bit more attention to detail I think you could make a very nice, energy efficient, easy to build, comfortable, and affordable house using their system.
Energy Positive with Renewable Energy
We’ve been living in and monitoring the Greeny Flat for 8 months now. A basic table of the results so far can be found on our Results Page. Looking at the Results Table you’ll see that we have now exported a total of 836kWh of electricity from the grid and we have exported 2652kWh to the grid. This means that we have put more than three times as much energy into the grid as we have taken out.
Given our original goal of trying to be energy positive this is a fantastic progress report. It seems pretty clear now that by the end of a full year of monitoring we will be way beyond energy positive. It’s exciting to think that we might even have enough excess energy to be able to run our house and charge an electric car and still be energy positive.
Water efficiency
Thanks to a VERY wet month of December we have been able to use a lot more tank water (5468 lt) than town water (1364 lt) this month so our overall usage of tank water and town water for the 8 months so far is almost exactly the same (28382 lt vs 28378 lt).
Our original goal was to try to use at least as much harvested rainwater as town water over the first year so we are exactly on track. We still have an almost full tank so we’re looking good for the moment. As you can see from the Results Table, our usage of tank water and town water varies dramatically from month to month depending entirely on how much rain we get in the month. For example, November was a very dry month so we used much more town water than tank water (the opposite to December). It’s also interesting to note that in the warm, dry months we also use a lot more water altogether. This is because in warm and dry months like October and November this year we had to do a lot more watering of the vegetable gardens and fruit trees. By comparison, in December the rain did a lot of the watering for us so our total water usage was lower.
Water conservation is also an important goal with the Greeny Flat. So far we have used a total of 56,760 litres which works out to an average of 233lt/day. This sounds like an awful lot of water. However, according to this Sydney Water Report from 2013, an average dwelling in our region uses 623lt/day. Unfortunately it proved to be very difficult to find figures on average daily water use per person. Nevertheless, we’re using less than half as much water per day as an average household in our region. And, in fact, we’re taking less than a quarter of the average out of the town water supply because, so far, half of our water has come from the rainwater we have harvested from our roof.
Our water conservation strategy is a combination of low-flow fixtures ( taps, toilet, and shower head), low-water-use appliances (the only water-using appliance we have is an Electolux EWF1074 washing machine with a 4.5 star water use rating and we wash dishes by hand), water-wise landscaping (plants and grass that need very little watering), and good water conservation habits like tapping short showers and not leaving taps running unnecessarily.
Comfort Levels
Over the last month the air temperature outside the Greeny Flat ranged from 7.6degC up to 41.3degC. That’s a swing of 33.7degC! Meanwhile the temperature inside only varied between 18.6degC and 28.5degC, a swing of only 9.9degC. This tells us that the Thermal Mass of the concrete floor is doing it’s job perfectly of moderating temperature fluctuations inside a Passive Solar Home.
 Graph showing the indoor and outdoor temperature fluctuations in summer at the Greeny Flat  Graph showing the indoor and outdoor temperature fluctuations in winter at the Greeny Flat The two graphs above are taken from our weather monitoring equipment which records many factors, including the indoor and outdoor temperature fluctuations. These demonstrate very elegantly the way that the indoor temperature in the Greeny Flat stays comfortably within about a ten degree band both summer and winter despite the fact that the outdoor temperature fluctuates dramatically. This is due to the Thermal Mass effect of the concrete slab floor which is a big part of what helps to keep the house comfortable year round.
In Other News
The Greeny Flat has been honoured with a four-page article in the latest issue of ReNew Magazine. ReNew is published by the Alternative Technology Association and is an excellent resource for anyone interested in sustainability in general and renewable energy systems in particular. Our thanks go to the ReNew team and in particular to the editor, Robyn Deed, for helping us to spread the word about affordable, energy-positive design and construction.
Recently one of the people who came to visit the Greeny Flat during Sustainable House Day asked me, ‘What do you want to do next, now that the Greeny Flat is proving it is relatively easy to build an energy positive home?’ After thinking about this question for a while I concluded that there were two main things I would like to see happen. One is to take the lessons learned so far from the Greeny Flat and other projects like Glenn and Lee Robinson’s home in Bundanoon and refine and expand them into a series of best-practice design and construction techniques for building affordable, sustainable homes appropriate to Australia’s various climate zones. The other is to make these techniques and designs readily available and accessible for the majority of Australians to see, experience, understand and copy…. which led to the following idea: (download pdf version)
Proof of Concept – Off-grid Eco-home Research and Display Centre

CONCEPT: To build a series of small, off-grid eco-neighbourhoods for the purpose of researching, testing, developing and displaying environmentally sustainable design and construction materials, techniques, and systems appropriate to Australia’s various climate zones. Ideally there will be at least one of these centres near each of our capital cities as well as Thredbo, Alice Springs and Cairns in order to cover all of our different climatic conditions and to make the display villages accessible to all our major population centres.
Scope of the Initial Project
The initial project is intended as a Proof of Concept to research, test, refine, develop, demonstrate and display affordable and effective techniques for improving the environmental performance of buildings and communities.
We envision a small, off-grid eco-neighbourhood (between 20 and 50 homes and community buildings) situated within easy reach of a major urban area and close to transportation in order to make it easy for people to come and experience a range of ecological building options. The entire project will be designed to be both energy and water self-sufficient using state-of-the-art systems to generate and store energy and to treat and recycle water. Energy efficiency and affordability will be of paramount importance in the design of the buildings with preference given to low-embodied-energy, recycled, renewable, durable, healthy and locally available materials.
The landscaping around the buildings will be designed to be food producing using Permaculture principles as well as cutting-edge sustainable farming practices and technologies. With intelligent design the gardens around and between the buildings will be both productive and beautiful (along the lines of “Village Homes” in Davis, California, see images below).

Once the overall project master planning, funding, and permitting process is complete, construction will occur in stages envisioned as follows (refer to Conceptual Master Plan above).
Stage1
- Build 6-12 small, similar homes with variations designed to allow direct comparison of the construction cost, embodied energy and construction time as well as operational performance, comfort, energy use and operating costs of a number of different ecological building materials, techniques, and systems.
Stage 2
- Build a small (easily expandable) research and development facility to house researchers and monitoring equipment for testing the Stage 1 homes. The intention behind the monitoring and testing being to clarify which ecological building techniques and materials are most effective and affordable for creating sustainable buildings.
- Begin construction of edible landscaping and food gardens to support the neighbourhood.
Stage 3
- While initial testing is being carried out on Stage 1 homes begin development of an eco-home display village.
- Make lots available for companies that build sustainably to erect display homes subject to certain criteria: 1) all homes must meet stringent sustainability standards including producing more energy than they use; 2) all homes must be able to be tested and monitored so that interested people can clearly and directly compare their options in terms of construction cost, embodied energy, build time, comfort levels, and operating costs; 3) all homes must be available for the public to view and experience.
Stage 4
- Following the first year of testing and monitoring the performance of the Stage 1 homes a second round of test homes will be built using the lessons learned from Stage 1 to refine and improve the designs, techniques and testing criteria.
- Stage 1 homes will now be made available as accommodation for people to come, stay, and “test drive” different options.
- Research centre will be expanded to include community educational facilities allowing people to stay for a week or a weekend and take classes relating to ecological building or other sustainable and/or community oriented learning, or volunteer to help with building further homes and food gardens.
Stage 5
- Commence the ongoing “feedback loop” process of further testing and refining designs, techniques, and systems to improve the sustainability and affordability of the test homes.
- Continue to increase and improve food growing systems on the land around the homes.
- Continue to build and monitor display homes for public viewing.
- If, at this stage, public interest is encouraging, funding is secure, and land is available, the project can expand into a fully-functioning eco-neighbourhood with homes, apartments, offices, health and recreation services, farmer’s markets, child-care and community facilities (e.g. park, playground, community centre, swimming pool, tennis courts, sports fields, etc.)
- If the original site is not large enough to support a complete neighbourhood then the lessons learned from testing and public feedback can be taken and applied to sustainable neighbourhood developments in other places.
Process
- Define the scope of the initial project (see above)
- Connect with potential partners, organisations, institutions, and individuals
- Define management and ownership structures
- Identify potential funding sources
- Refine all of the above and secure funding
- Find the perfect site (see below)
- Master planning and permitting (staged as required)
- Begin construction (staged as above)
- Testing and recording results
- Feedback loop (refine designs, systems and techniques for further trials based on test results)
- Education and demonstration (teaching, sharing, showing)
- Feedback loop (refine designs, systems and techniques for further trials based on public response)
- Apply lessons and expand project into a fully-functioning neighbourhood
- Apply lessons to future projects on other sites
Potential Partners
- Local Councils
- State and Federal Government agencies
- Universities, TAFE colleges, other educational institutions
- Sustainably-minded developers
- Ecologically-oriented architects, designers and builders
- Sustainable building manufacturing companies
- Sustainable materials suppliers and manufacturers
- Sustainable farming and agriculture researchers and developers
- Waste treatment and reduction system researchers and developers
- Renewable energy and storage system researchers and developers
- Holistic health service providers
Ideal Site Requirements
- Excellent solar access
- North slope
- Local council fully supportive of the concept
- 1-10 hectares of under-utilised infill land within an already developed area (not untouched agricultural land or natural habitat) preferably brownfield site, i.e. disused industrial land
- Close to major transportation (e.g. Sydney/Melbourne Freeway, train station, bus route)
- Close to existing services (shops, jobs, schools, recreation, etc)
|
We will not share your information with anyone else and you can unsubscribe at any time.
Recent Newsletters
-
Apr 6, 2024: Open for Sustainable House Day
-
Apr 1, 2022: These floods are no joke
-
Mar 4, 2022: Disasters of Our Own Design
-
Nov 12, 2021: Free Zoom Screening of ‘Now’ Movie on Sunday
-
Nov 5, 2021: The Times They Are A-Changing
-
Oct 14, 2021: Sustainable House Day is Back… virtually
-
Sep 24, 2021: Two Years In the Cottage
-
Jun 25, 2021: Cheap and Simple EV
-
May 14, 2021: 3D Printed Earth Home
-
Feb 26, 2021: Doing Something About It
-
Feb 12, 2021: Barangarooted
-
Jan 29, 2021: Our House on the ABC
-
Jan 8, 2021: Electric Vehicle Madness
-
Dec 12, 2020: Water Works and Solar Cars
-
Nov 13, 2020: Arts Trail Open House
-
Oct 2, 2020: Another Year of Living Positively
-
Sept 18, 2020: Virtual Sustainable House Day on Sunday
-
Sept 11, 2020: Back in Mittagong
-
Aug 28, 2020: One More Week in Port Macquarie
-
August 21, 2020: Progress Report
-
August 14, 2020: This week’s progress report
-
August 7, 2020: Port Project Photos
-
July 17, 2020: Port Macquarie Project Progress
-
June 26, 2020: All Electric Workhorses.
-
June 19, 2020: Port Macquarie Project
-
June 5, 2020: Mount Gibraltar Stone Stairway
-
May 22, 2020: Morrison Wants To Give $11M To A Coal Baron
-
April 22, 2020: Happy Earth Day
-
Mar 13, 2020: Coronavirus makes me feel lucky
-
Feb 20, 2020: Kitchen finished
-
Jan 31, 2020: How To Build a Fire-proof House
-
Jan 24, 2020: Back To Work
-
Jan 3, 2020: Childhood Beach Devastated By Fire
-
Nov 22, 2019: Energy Positive Success
-
Nov 1, 2019: Art Studio Trail This Weekend
-
Oct 18, 2019: Solar Monitoring and Upcoming Events
-
Oct 11, 2019: Queen St Renovations
-
Sept 28, 2019: Greta vs Growth
-
Sept 6, 2019: Sustainable House Day 2019 next weekend.
-
Aug 30, 2019: Solar Installed
-
Aug 23rd, 2019: Solar System Ordered and Other Notable Stuff
-
Aug 16, 2019: Two Projects Finished and Sustainable House Day Coming Up.
-
July 12, 2019: The Beauty of Bamboo
-
July 5, 2019: Back To Russell Island
-
June 28, 2019: Kitchen Upgrade
-
June 21, 2019: What’s Your 2040?
-
May 24, 2019: Public Meeting in Bowral on Friday 31st of May
-
April 26, 2019: Reader Feedback on Granny Flat Economics
-
April 12, 2019: The Economics of Granny Flats
-
Feb 20, 2019: Russell Island Home Tour
-
Feb 8, 2019: Russell Island Nearly Finished
-
Jan 25, 2019: Progress and Other Good Stuff
-
Jan 18, 2019: New Leaf and Progress Photos
-
Jan 4, 2019: Doors and Architraves
-
Dec 28, 2018: Russell Island house progress.
-
Dec 12, 2018: Back on Russell Island
-
Nov 16, 2018: Greeny Flat For Rent
-
Nov 9, 2018: A Tale of Two Houses
-
Oct 2018: Is The Housing Market Starting to See the Light?
-
Sept 16, 2018: Greeny Flat Testimonial.
-
Sept 7, 2018: Lighter Roofs and Cheaper PHEVs
-
August 31, 2018: Windows and Cladding
-
August 17, 2018: Adamant About Eaves
-
August 3rd, 2018: Raising the Roof
-
July 27, 2018: Progress Photos
-
July 13, 2018: Project Progress
-
July 7, 2018: Affordable Housing Project in QLD
-
May 11, 2018: DIY Retrofit Double-Glazing
-
May 4th, 2018: Greeny Flat Available to Rent – Jun/Jul/Aug
-
April 20, 2018: Why you MUST monitor your solar system.
-
April 6, 2018: 4th Earth Day Party – April 22
-
March 30, 2018: It’s a Great Time For Solar
-
March 23, 2018: Beware of Tradies In Your Attic
-
March 16, 2018: More Sustainable Subdivisions
-
March 2, 2018: More Solar For Landlords and Renters
-
Feb 23, 2018: The Reroofing Begins
-
Feb 16, 2018: Record Year for Rooftop Solar
-
Feb 9, 2018: Cooking With Compost
-
Feb 2, 2018: Waste-to-Energy Systems
-
Jan 16, 2018: Should I Replace My Tile Roof
-
Dec 12, 2018: More About Keeping Cool
-
Jan 5, 2018: Keeping Your Cool
-
Dec 29, 2017: Happy New Year
-
Dec 22, 2017: Upside-down Season
-
Dec 8, 2017: Bitcoin Climate Disruption
-
Dec 1, 2017: The Coming Disruption
-
Nov 24, 2017: Suncrowd Review – 0 Stars
-
Nov 17, 2017: Tesla Tiny House Here Next Week
-
Nov 2, 2017: Montana Off-grid Eco Tiny House
-
Oct 27, 2017: Glorious Rain and Good Results
-
Oct 20, 2017: Cattle… Good or Bad?
-
Oct 13, 2017: The Snow Shows Where the Heat Goes
-
Sept 6, 2017: Tesla Tiny House coming to Bowral
-
Sept 29, 2017: Home Solar and Double-dipping on Carbon Emissions
-
Sept 22, 2017: Time to Load Up On Solar
-
Sept 15, 2017: Sustainable House Day This Sunday.
-
Sept 8, 2017: Project Progress, Yellowstone, Etc
-
August 31, 2017: Day Tripping in Montana
-
August 25, 2016: Electric Vehicle Update
-
August 18, 2017: State of The States
-
August 11, 2017: Cool Stuff
-
August 4, 2017: Going to Montana
-
July 28, 2017: Episode 13 – West Side Shade Awning and Deck
-
July 21, 2017: Now That’s True Sustainability!
-
July 14, 2017: How To Choose The Best Electricity Retailer
-
July 7, 2017: A Year of PHEVing It.
-
June 30, 2017: Case Study – Holiday House Energy Upgrade
-
June 23, 2017: In The News This Week
-
June 16, 2017: Grow Your Bricks and Monitor Your Energy
-
June 9, 2016: A New Ethical Energy Retailer
-
June 2, 2017: Dark Days and Bright Spots
-
May 19, 2017: Things That Caught My Eye
-
May 12, 2017: The Sublime and the Ridiculous
-
May 4, 2017: Episode 12 – Replacing the Sewer Lines
-
April 28, 2017: Doing the Dirty Work
-
April 21, 2017: Ban the Bag
-
April 14, 2017: One Down, One Billion to Go.
-
April 7, 2017: 3RD EARTH DAY PARTY – April 22
-
March 30, 2017: Electric Shocks
-
March 17, 2017: Big Changes Coming
-
March3, 2017: Massive Erections
-
Feb 24, 2017: PHEV Love
-
Feb 2, 2017: Every Home Needs This!
-
Feb 3, 2017: Episode 11 – How To Make a Solar Air Heating Wall
-
Jan 20, 2017: Episode 10 – Why Build a Solar Air Heating Wall?
-
Jan 13, 2017: Agents of Change and a New Local Brew
-
Jan 6, 2017: Starfish and the Cost of Australia’s Poor Quality Houses
-
Dec 23, 2016: Episode 9 – What’s a Trombe Wall?
-
Dec 16, 2016: Episode 8 – Retrofitting Passive Solar
-
Dec 11, 2016: Episode 7 – New Windows in Old Walls
-
Nov 25, 2016: Repower Excitement and Episode 6
-
Nov 18, 2016: Community Renewable Energy Investment Opportunity
-
Nov 4, 2016: Window Replacement and Tesla’s New Battery
-
Oct 28, 2016: Suncrowd! What a Buzz!
-
Oct 20, 2016: Episode 4 and Catchpower Answers
-
Oct 14, 2016: Episode 3 – Borers, Rot and Underfloor Ventilation
-
Oct 7, 2016: Episode 2 and SunCrowd Invitation
-
Sept 30, 2016: Home Energy Retrofit Video 1
-
Sept 23, 2016: Catch Power – So What’s The Catch?
-
Sept 16, 2016: What To Do at the End of the 60c Feed-in Tariff
-
Sept 9, 2016: Happy Sustainable House Day!
-
Sept 2, 2016: The Beginning of the End of Solar Subsidies in NSW
-
August 25th, 2016: Lessons from an Infrared Camera
-
Aug 19, 2016: Open Source Tiny Homes
-
August 12, 2016: Sustainable House Day 2016
-
Aug 4, 2016: Solar Bulk-buy with SunCrowd
-
July 29, 2016: ‘Free’ Power with Repower
-
July 21, 2016: Fibro Cottage Energy Retrofit
-
July 15, 2016: Science With a Conscience
-
July 8, 2016: Election Day – Droning On
-
June 25, 2016: ‘Renewable Electricity’ is NOT ‘Renewable Energy’
-
June 19, 2016: The Power of TV and The Rise of The Machines
-
June 12, 2016: Magnetite, Drones and Climate Action
-
June 4, 2016: Stools to Fuels
-
May 29th, 2016: The Future of Energy?
-
May 21, 2016: Concrete Alternatives and PCM’s
-
May 15, 2016: First the Good News
-
May 8, 2016: Underslab Insulation
-
May 1, 2016: Counting Comfort and Costs
-
April 24, 2016: Celebrating Two Years of Energy Positive Living
-
April 17, 2016: Gimme Three Reasons
-
Apr 10, 2016: Second Earth Day Party, 4-7pm April 22nd.
-
April 3, 2016: Home Battery Updates
-
Mar 26, 2016: An Electric Transportation Revolution
-
Mar 18, 2016: Mould and Other Fun Stuff
-
Mar 12, 2016: Reader Feedback and Lithium Issues
-
Mar 6, 2016: Beware of ‘Standard Practices’
-
Feb 28, 2016: Fossil Fools
-
Feb 20, 2016: Grow, Cook, Eat – Offgrid Power – and Welsh Cars
-
Feb 14th, 2016: Gotta Love These Little Houses
-
Feb 7, 2016: Renewable Energy Prepares For Take Off
-
Jan 24, 2016: PHEV Goes Bush
-
Jan 17, 2016: 1.5L/100km
-
Jan 10, 2016: How To Reduce Our Carbon Footprint
-
Jan 3, 2016: PHEV Goes Camping
-
Dec 27, 2015: Electric Driving Less Than Half The Cost of Petrol
-
Dec 20, 2015: Our First Week With an Electric Vehicle
-
Dec 13, 2015: Putting My Money Where My Mouth Is.
-
Dec 13, 2015: Paris Talks Waffle?
-
Nov 29, 2015: Walking for Climate Action and Driving Electric Vehicles
-
Nov 15, 2015: Battery Storage Options
-
Oct 8, 2015: The Big Disconnect?
-
Nov 11, 2015: 7,377,870,064 Elephants in the Room
-
Oct 25, 2015: Pros and Cons of Granny Flats
-
Oct 16, 2015: Greeny Flat Wins Green Globe Award!
-
Oct 11, 2015: What’s Wrong With This Picture?
-
Sep 27, 2015: Build Tight, Vent Right
-
Sep 20, 2015: Driving Sustainability
-
Sept 12, 2015: Greeny Flat Named 2015 Green Globe Awards Finalist
-
Sept 6, 2015: Sustainable House Day
-
August 27, 2015: Water, Water Everywhere!
-
August 23, 2015: Back in Brazil
-
August 14, 2015: Ranch Life and Sustainable House Day
-
August 7, 2015: Greetings From Montana
-
August 8, 2015: Renewable Choice for Oz Voters
-
July18, 2015: Whoops, I Spoke Too Soon
-
Jul 12, 2015: Nice Weather for Eskimos
-
Jul 5, 2015: Solar Planes, Trains and Automobiles
-
Jun 28, 2015: Greeny Flat Welcomes Sustainable Lifestyle
-
Jun 21, 2015: Happy Winter Solstice!
-
Jun 14, 2015: Test Drive the Greeny Flat
-
Jun 7, 2015: Visit to a Local Food Forest
-
May 31, 2015: Exciting Times!
-
May 24, 2015: The Heat Goes On
-
May 17, 2015: DIY Solar Air Heater Prototype
-
May 10, 2015: K.I.S.S. My House
-
May 3rd, 2015: Tesla Reinvents Electicity
-
Apr 26, 2015: Party Pics and Random Bits.
-
Apr 22, 2015: Experiment Declared Resounding Success!
-
Apr 19, 2015: Greeny Flat’s 1st Earth Day Party this week
-
Apr 12, 2015: Sand Wars, Floating Solar Farms and other Fun Stuff.
-
Apr 5, 2015: Invitation to a Party
-
Apr 4, 2015: UK’s First Carbon Neutral Town
-
Mar 21, 2015: Latest Results and Reader Feedback
-
Mar 16, 2015: Our Double-glazed Windows
-
Mar 8, 2015: Form Follows Function
-
Mar 8, 2015: Reader Feedback
-
Mar 1, 2015: Some Fun Stuff
-
Feb 22, 2015: Proof Positive
-
Feb 15, 2015: Case Studies – Heat Doesn’t Rise
-
Feb 8, 2015: In all sorts of hot water
-
Feb 2, 2015: Rethinking the way we design and build
-
Jan 25, 2015: Latest Results and Electric Vehicles.
-
Jan 20, 2015: The GreenPower plot thickens
-
Jan 18, 2015: Switching to Green Power
-
Jan 11, 2015: Our surface-mounted electrical system
-
Jan 4, 2015: Our Solar Power System
-
Dec 28, 2014: Sandwiches for Cathedrals
-
Dec 24, 2014: December Results
-
Dec 16, 2014: Eco-home Display Village Concept
-
Dec 14, 2014: All New Homes to be Energy Positive by 2016.
-
Dec 7, 2014: $41 Energy Bill for last three months
-
Nov 25, 2014: Think light for a cooler roof
-
Nov 22, 2014: Staying cool in the heat
-
Nov 9, 2014: The benefits of a small home.
-
Oct 26, 2014: Last Sunday the Greeny Flat made 4 TIMES as much energy as it used!
-
Oct 12, 2014: Lessons learned so far
-
Oct 10, 2014: Why an all electric house?
-
Sept 22, 2014: Great Day for Renewable Energy
-
Sept 21, 2014: Greeny Flat Cost Analysis
-
Sept 11, 2014: $10.63 worth of energy in 3 months.
-
August 30, 2014: Greeny Flat open for Sustainable House Day
-
August 22, 2014: Four months and going strong.
-
July 22, 2014: Three month’s results… All Positive!
-
July 4, 2014: Energy Independence Day!
-
June 11, 2014: Cintia’s winter
-
May 27, 2014: Greeny Flat on ABC
-
May 27, 2014: Cool Fridge Wins Energy Star Wars
-
May 23, 2014: Testing the air-tightness
-
May 19, 2014: First month’s results… VERY promising!
-
Apr 22, 2014: Earth Day marks the start of one year of monitoring
-
Mar 24, 2014: start of a big week
-
Mar 7, 2014: BASIX is a JOKE!
-
Mar 6, 2014: starting on the kitchen
-
Mar 1, 2014: Pumps and Solar Hot Water: decisions, Decision, DECISIONS!
-
Feb 24, 2014: Greeny Flat in the news
-
Feb 20, 2014: surface mounted electrical system
-
Feb 19, 2014: end in sight for the construction phase.
|

